In the first post of this series, I got started with Ansible running in Gitlab CI. This involved setting up the basic pipeline, configuring the remote machines for use with our system and making a basic playbook to perform package upgrades. In this post we’re going to build on top of this to create a re-usable Ansible role to deploy some software and configuration to our fleet of servers. We will do this using the power of Ansible roles.
In last week’s post I described my monitoring system, based on checkmk. At the end of the post I briefly mentioned that it would be great to use Ansible to deploy the checkmk agent to all my systems. That’s what I’m going to describe in this post. The role I’ve created for this deploys the checkmk agent from the package download on my checkmk instance and configures it to be accessed via SSH. It also installs a couple of plugins to enable some extra checks on my systems.
A Brief Aside: ansible-lint
In my previous post I set up a job which ran all the playbooks in my repository with the --check flag. This performs a dry run of the playbooks and will alert me to any issues. In that post I mentioned that all I was really looking for was some kind of syntax/sanity checking on the playbooks and didn’t really need the full dry run. Several members of the community stepped forward to suggest ansible-lint – thanks to all those that suggested it!
I’ve now updated my CI configuration to run ansible-lint instead of the check job. The updated job is shown below:
ansible-lint:
  <<: *ansible
  stage: check
  script:
    - ansible-lint -x 403 playbooks/*.yml
This is a pretty basic use of ansible-lint. All I’m doing is running it on all the playbooks in my playbooks directory. I do skip a single rule (403) with the -x argument. The rule in question is about specifying latest in package installs, which conflicts with my upgrade playbook. Since I’m only tweaking this small thing I just pass this via the CLI rather than creating a config file.
I’ve carried the preflight jobs and the ansible-lint job over to the CI configuration for my new role (described below). Since this is pretty much an exact copy of that of my main repo, I’m not going to explain it any further.
Creating a Base Role
I decided that I wanted my roles self contained in their own git repositories. This keeps everything a bit tidier at the price of a little extra complexity. In my previous Ansible configuration I had all my roles in the same repo and it just got to be a big mess after a while.
To create a role, first initialise it with ansible-galaxy. Then create a new git repo in the resulting directory:
$ ansible-galaxy init ansible_role_checkmk_agent
$ cd ansible_role_checkmk_agent
$ git init .
I actually didn’t perform these steps and instead started from a copy of the old role I had for this in my previous configuration. This role has been tidied up and expanded upon for the new setup.
The ansible-galaxy command above will create a set of files and directories which provide a skeleton role. The first thing to do is to edit the README.md and meta/main.yml files for your role. Just update everything to suit what you are doing here, it’s pretty self explanatory. Once you’ve done this all the files can be added to git and committed to create the first version of your role.
Installing the Role
Before I move on to exactly what my role does, I’m going to cover how we will use this role in our main infrastructure project. This is done by creating a requirements.yml file which will list the required roles. These will then be installed by passing the file to ansible-galaxy. Since the installation tool can install from git we will specify the git URL as the installation location. Here are the contents of my requirements.yml file:
---
 - name: checkmk_agent
   scm: git
   src: git+https://gitlab.com/robconnolly/ansible_role_checkmk_agent.git
   version: master
Pretty simple. In order to do the installation all we have to do is run the following command:
$ ansible-galaxy install --force -r requirements.yml -p playbooks/roles/This will install the required Ansible roles to the playbooks/roles directory in our main project, where our playbooks can find them. The --force flag will ensure that the role always gets updated when we run the command. I’ve added this command in the before_script commands in the CI configuration to enable me to use the role in my CI jobs.
Now the role will be installed where we actually need it. However, we are not yet using it. I’ll come back to this later. Let’s make the role actually do something first!
What the Role Does
The main behaviour of the role is defined in the tasks/main.yml file. This file is rather long, so I won’t reproduce this here. Instead I’ll ask you to open the link and follow along with my description below:
- The first task creates a
checkmkuser on the target system. This will be used by checkmk to log in and run the agent. - The next task creates a
.sshdirectory for thecheckmkuser and sets it’s permissions correctly. - Next we create an
authorized_keysfile for the user. This uses a template file which will restrict what the key can do. The actual key comes from thecheckmk_pub_keyvariable which will be passed in from the main project. The template is as follows:
command="/usr/bin/sudo /usr/bin/check_mk_agent",no-port-forwarding,no-x11-forwarding,no-agent-forwarding {{ checkmk_pub_key }}- Next are a couple of tasks to install some dependent packages for the rest of the role. There is one task for Apt based systems and another for Yum based systems. I’m not sure if the
monitoring-pluginspackage is actually required. I had it in my previous role and have just copied it over. - The two tasks remove the
xinetdpackage on both types of system. Since we are accessing the agent via SSH we don’t need this. I was previously using this package for my agent access so I want to make sure it is removed. This behaviour can be disabled by setting thecheckmk_purge_xinetdvariable to false. - The next task downloads the checkmk agent deb file to the local machine. This is done to account for some of the remote servers not having direct access to the checkmk server. I then upload the file in the following task. The variables
checkmk_server,checkmk_site_nameandcheckmk_agent_debare used to specify the server address, monitoring instance (site) and deb file name. The address and site name are designed to be externally overridden by the main project. - The next two tasks repeat the download and upload process for the RPM version of the agent.
- We then install the correct agent in the next two tasks.
- The following task disables the systemd socket file for the agent to stop it being accessible over an unencrypted TCP port. Right now I don’t do this on my CentOS machines because they are too old to have systemd!
- The final few tasks get in to installing the Apt and Docker plugins on systems that require it. I follow the same process of downloading then uploading the files and make them executable. The Docker plugin requires that the
dockerPython module be installed, which we achieve viapip. It also requires a config file, which as discussed in my previous post needs to be modified. I keep my modified copy in the repository and just upload it to the correct location.
The variables that are used in this are specified in the vars/main.yml and defaults/main.yml files. The default file contains the variables that should be overridden externally. I don’t specify a default for the SSH public key because I couldn’t think of a sensible value, so this at least must be specified for the role to run.
With all this in place our role is ready to go. Next we should try that from our main project.
Applying the Role
The first thing to do is to configure the role via the variables described above. I did this from my hosts.yml file which is encrypted, but the basic form is as follows:
all:
  vars:
    checkmk_server: <server_ip>
    checkmk_site_name: <mysitename>
    checkmk_pub_key: <mypubkey>
The public key has to be that which will be used by the checkmk server. As such the private key must be installed on the server. I’ll cover how to set this up in checkmk below.
Next we have the playbook which will apply our role. I’ve opted to create a playbook for applying common roles to all my systems (of which this is the first). This goes in the file playbooks/common.yml:
---
- hosts: all
  roles:
    - { role: checkmk_agent }
This is extremely basic, all it does is apply the checkmk_agent role to all servers.
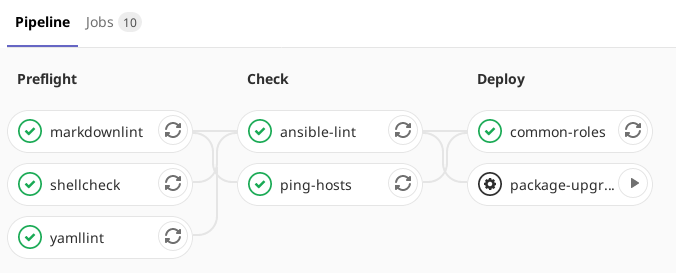
The corresponding CI job is only marginally more complex:
common-roles:
  <<: *ansible
  stage: deploy
  script:
    - ansible-playbook playbooks/common.yml
  only:
    refs:
      - master
With those two in place a push to the server will start the pipeline and eventually deploy our role to our servers.
Configuring Checkmk Agent Access via SSH
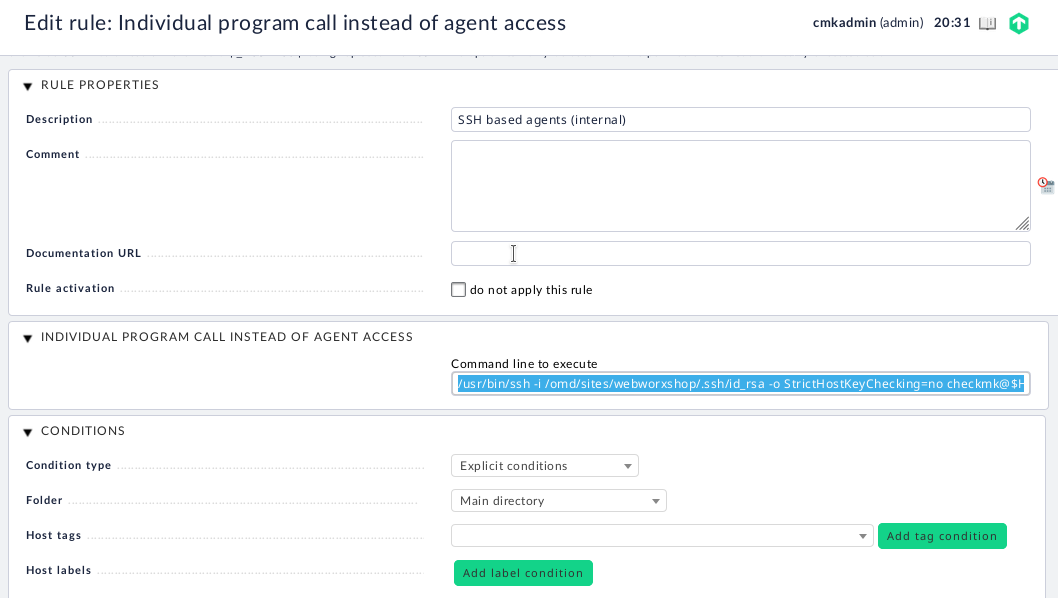
Of course the deployment on the remote servers is only one side of the coin. We also need to have our checkmk instance set up to access the agents via SSH. This is documented pretty well in the checkmk documentation. Basically it comes down to putting the private key corresponding to the public key used earlier in a known location on the server and then setting up an “Individual program call instead of agent access” rule in the “Hosts and Service Parameters” page of WATO.
I modified the suggested SSH call to specify the private key and user to use. Here is the command I ended up using in my configuration.
/usr/bin/ssh -i /omd/sites/site_name/.ssh/id_rsa -o StrictHostKeyChecking=no checkmk@$HOSTADDRESS$When you create the rule you can apply it to as many hosts as you like. In my setup this is all of them, but you should adjust as you see fit.
Conclusion
If you’ve been following along you should now be able to add new hosts to your setup (via hosts.yml) and have the checkmk agent deployed on them automatically. You should also have an understanding of how to create reasonably complex Ansible roles in external repositories and how to use them in your main Ansible project.
There are loads of things about roles that I haven’t covered here (e.g. handlers). The best place to start learning more would be the Ansible roles documentation page. You can then fan out from there on other concepts as they arise.
Next Steps
So far on this adventure I’ve tested my playbooks and roles by just making sure they work against my servers (initially on a non-critical one). It would be nice to have a better way to handle this and to be able to run these tests and verify that the playbook is working from a CI job. I’ll be investigating this for the next part of this series.
The next instalment will probably be delayed by a few weeks. I have something else coming which will take up quite a bit of time. For my regular readers, there will still be blog posts – they just won’t be about Ansible or CI. This is probably a good thing, I’ve been covering a lot of CI stuff recently!
As always please get in contact if you have any feedback or improvements to suggest, or even if you just want to chat about your own Ansible roles.
Leave a Reply