This post may contain affiliate links. Please see the disclaimer for more information.
This post is part of my “Home Assistant Automation in Depth” series. Here is the series index:
- Part 1: Making my mornings a little easier
- Part 2: Fusing Sensors Together for Stateful Automations
- Part 3: Multi-function NFC Tags
Welcome to the latest installment in my Home Assistant Automation in Depth series! In this article we’re going to explore how I’m using NFC tags with Home Assistant to control various aspects of my home automation. Specifically, I’m going to show my approach to making an NFC tag perform different actions depending on context.
I’m not going to dive headlong into an explanation of what NFC is. If you managed to somehow arrive at this page without knowing that, go and read the Wikipedia page! For our purposes it is sufficient to say that we can scan these little tags with our phone and some code will react to the scanning event.
How is NFC useful in Home Assistant?
Hopefully, you are already joining the dots in seeing how this is useful. Basically an NFC tag is a nice way to provide an input to a system. Think of it like a magic wireless button, that doesn’t need batteries! (assuming you charge your phone of course).
There is actually a little more to it than that. Since we won’t store anything sensitive on the tag itself we can safely leave them in public places. For example you could place one outside your front door. Only a phone which has been pre-configured with our setup will be able to execute the actions we have specified. Also, Android phones must be unlocked to scan the tags giving an extra layer of security.
There is a wrinkle with this, however. If someone knows the location of your tag they could potentially re-write it with some other (malicious?) data. There appears to be a way to write protect tags in the NFC Tools app I use below. However, I haven’t tried it yet. Make sure you do this if you want to place tags in areas where someone untrusted may have access!
Of course, the price of this is that you must have your phone on you which isn’t such a big deal. It may mean that you might not want to use these for tasks which need to be done very quickly or potentially with your hands full.
Connecting to HASS
There are at least two ways to connect NFC tags into Home Assistant. We can either use a dedicated app, or we can use Tasker with a plugin to accomplish the same thing. I’m going to describe the Tasker route, since I already had this in place before the HASS NFC app became available. Tasker is also allows you to do much more, so is a good app to have in any case.
The plugin we need for Tasker is called NFC Tasks and is free. In addition, we’ll need it’s companion app NFC Tools (also free) to configure our tags. You’ll also need Tasker and some NFC tags (obviously). I like the sticker variety (alternative link) for home automation purposes. However, they come in all kinds of shapes and sizes.
Once you have all the software installed it’s time to start connecting things up. First we’re going to want to setup Tasker to talk to Home Assistant via the REST API. This has got a little more complex if you want to use the new authentication system. However, there is a useful tutorial on the Home Assistant forum (thanks to @bokub for that!). This involves creating a specific task which can be re-used to talk to HASS. Go away and follow the instructions to do that now!
Welcome Back!
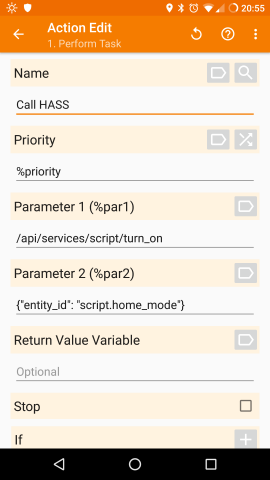
Once you’ve done that, you’ll need to set up another task (as detailed in the tutorial) which will be called when our NFC tag is scanned. I’m going to call a script, so mine looks like the screenshot below, but you can call any service in Home Assistant.

At this point you can test your task by executing it in Tasker and making sure it calls the right thing in HASS. You’ll then need to back right out of Tasker in order for it to apply the settings. If you don’t do this the task won’t show up later. Press the back button until you land back at the home screen, don’t just press the home button!
Writing the Tag
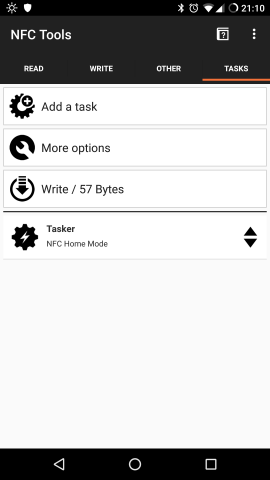
For the next part, we open the NFC Tools app and head to the tab called ‘Tasks’. Click the ‘Add a Task’ button, then navigate to ‘Various’ and ‘Tasker’. Hit the magnifier/search icon next to the task name input, then select the task you just created from the pop-up and press the ‘OK’ button. When you’re done, you should land at a screen like the one below. Hitting the write button will prompt you to scan the tag to write it.

If you now exit the NFC Tools app and scan the tag, you should see that your Tasker task is executed. This in turn performs your Home Assistant action.
At this point it should be noted that you can execute more than one task from a single tag. NFC Tool/Tasks also have a whole load of tasks built in, most of which I’ve not tried. Feel free to have a play around!
UPDATE: /u/databoy2k on reddit suggested an alternative way of doing this, which centralises more of the logic on the HASS server and so scales better to more tags/phones. I haven’t had time to try it fully yet, but I’ll probably switch over to it in future.
On the Home Assistant side
So now we have an NFC tag which can perform an action in Home Assistant. I’m now going to share how I’m using one particular tag as a multi-function switch for different modes in my house. I’ll start with an input_select to define the different modes I want:
input_select:
  home_mode:
    name: "Home Mode"
    options:
      - "None"
      - "Coffee Time!"
      - "Lunchtime"
      - "Bedtime"
      - "Night"
I’ve placed my tag on the door frame of the door between our kitchen/living area and the rest of the house. This means I can scan the tag when I go through the door to select a different mode.
The question now is, how does the system know which mode to select? I’m doing this based on time of day, since my modes are mostly based around different events which fit within a rough timeframe. You can use pretty much any state or information from Home Assistant via a template. Here is my script which achieves this:
script:
  home_mode:
    alias: Home Mode Switch
    sequence:
      - alias: Select Home Mode
        service: input_select.select_option
        data_template:
          entity_id: input_select.home_mode
          option: >
            {% if now().hour < 7 %}
            Bedtime
            {% elif now().hour < 12 %}
            Coffee Time!
            {% elif now().hour < 18 %}
            Lunchtime
            {% else %}
            Bedtime
            {% endif %}
The keen eyed among you would have noticed that this is the script which is being called when my NFC tag is scanned. Here I simply set the value of the input select based on time of day. You’ll see that ‘Bedtime’ appears twice in order to handle the before and after midnight cases. With this setup:
- Scanning the tag between 7am and 12pm will set the mode to ‘Coffee Time!’
- A scan of the tag between 12pm and 6pm will set the mode to ‘Lunchtime’
- Scanning at any other time will set the mode to ‘Bedtime’.
Handling the Modes
I handle each mode via an automation. Firstly, let’s go with the ones for my coffee and lunchtimes:
automation:
  - alias: Coffee/Lunchtime Lights
    trigger:
      - platform: state
        entity_id: input_select.home_mode
        to: "Coffee Time!"
      - platform: state
        entity_id: input_select.home_mode
        to: "Lunchtime"
    action:
      - service: light.turn_on
        entity_id: light.kitchen_downlights

  - alias: End of Coffee/Lunch Time
    trigger:
      - platform: state
        entity_id: input_select.home_mode
        to: "Coffee Time!"
        for:
          minutes: 10
      - platform: state
        entity_id: input_select.home_mode
        to: "Lunchtime"
        for:
          minutes: 30
    action:
      - service: light.turn_off
        entity_id: light.kitchen_downlights
      - service: input_select.select_option
        data:
          entity_id: input_select.home_mode
          option: None
This basically implements some timed lighting for my break times during the day. I was always forgetting to turn off the kitchen lights when going back to work, so now I don’t have to. The timed lights also serve as a nice reminder that it is actually time to go back to work!
Since we already stored the state in the input_select we can use this as the timed trigger for the lighting off rule. This avoids the need for an external timer. Once we are done, we set the mode back to ‘None’
Next, we’ll tackle the bedtime mode. This is pretty simple, it just calls a script which turns off the lights and other appliances:
automation:
  - alias: Bedtime
    trigger:
      - platform: state
        entity_id: input_select.home_mode
        to: "Bedtime"
    action:
      - service: script.turn_on
        entity_id: script.bedtime
      - service: input_select.select_option
        data:
          entity_id: input_select.home_mode
          option: Night
Conclusion
So there we have it – a multi-functional NFC tag which triggers different actions in Home Assistant, depending on the time of day. This approach has been working really well for me for quite some time. I’ve only recently upgraded it to the new authentication scheme, but it works flawlessly.
With the power of Home Assistant scripts, particularly the templating options, this approach could be taken a lot further than the simple examples I’ve shown here. One idea would be to turn on or off different appliances dependent on the state of other sensors. Another is to perform different actions depending on who is home at the time.
There are also probably further extensions, like doing different actions depending on the phone which scans the tag. I suspect the logic for this would have to be built into the Tasker task on the phone. For example each phone could call a different script on the server.
I’d also like to give these a try for outdoor use, with the write protect enabled of course. I think I might need to find some more durable tags for that experiment however, the stickers don’t feel very weather proof.
I’m interested to see what else people are doing with NFC and Home Assistant. Please get in touch via the comments and Twitter to let me know!
If you liked this post and want to see more, please consider subscribing to the mailing list (below) or the RSS feed. You can also follow me on Twitter. If you want to show your appreciation, feel free to buy me a coffee.

Any suggestions for the IOS side of things?
Hi Larry,
I’m afraid I don’t use iOS, so I can’t confirm this, but there was some discussion on reddit about using launch shortcuts with the HASS iOS app.
Hope this helps!
EDIT: this was also just posted on reddit, specifically for iOS.
Good read, just used this as a template to configure my setup!
Thanks, glad you liked it!