This week’s post is going to be a little shorter than normal, since I’ve been working on projects which aren’t ready to share yet. However, I did want to share a quick, but useful approach to controlling smart devices directly from the home screen of your Android device via some Android shortcuts and Home Assistant.
Let’s Get Started
The app I’m using to do this is called HTTP Shortcuts. It’s both free (as in beer) and Open Source. You could accomplish the same thing with Tasker and even though I also use Tasker, I still use this app. This is because it’s just a nice simple app that does one thing well. You can also execute these shortcuts from within Tasker if you would like.
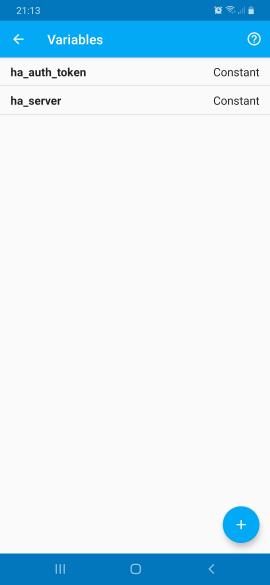
Before we create a shortcut, we’re going to add a couple of variables to make life a bit easier when creating multiple shortcuts. To do this press the {} icon in the top left corner. We are going to add two variables, one for the the HASS server name and another for the authentication token.
The first of these is easy, simply add a new variable with the plus icon and enter the key as ha_server. Leave the type as constant and add the hostname of your HASS server as the value. Make sure to not include the URL scheme here (http:// or https://) since this appears to throw off the regex validation when creating the shortcut.
For the second variable follow the same process, however you’ll want to insert the value of the long lived access token you get from your Home Assistant user’s profile page in the value field.
Creating Shortcuts
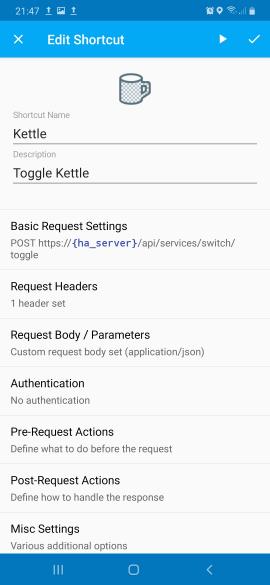
With that bit of prep done we can navigate back to the main page. Here we will add a new shortcut by again clicking the plus icon. First give your shortcut a name and description. These are only for your own use. You might also want to choose an icon at this point.
Next, hit the ‘Basic Request Settings’ item to and set the method to POST. In the URL field we enter the value:
https://{ha_server}/api/services/[domain]/[service]Here you’ll replace [domain] with the entity type e.g. switch and [service] with the service name, e.g. turn_on. I find that using the toggle service is the most useful for these shortcuts, since you are usually using them in visual range of the device and it basically gives you two shortcuts in one.
The {ha_server} notation should be left as it is. This is using the variable we created earlier. Variables can actually be easily inserted with the {} button so there is no need to type it. You’ll also want to adjust my example above if you are using plain HTTP rather than HTTPS.
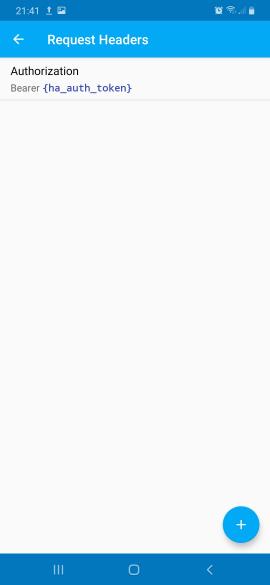
Adding Headers
The next stage of this is to add a custom header to our request. This is the Authorization header which has the value Bearer {ha_auth_token}. You’ll see here that we use the other of our variables to include the authentication token.
Request Body
Finally we come to the request body. Here we set the request body type to ‘Custom Text’. The content type field here should again be set to application/json and the value should be the JSON to pass to the service. In the simple case this would just contain the entity ID you want to operate on, e.g {"entity_id": "switch.myswitch"}. Of course this might contain more data depending on the service you are calling. The data is exactly the same as that passed to the services developer tool in HASS, so you can test your calls there and then copy the data over.
Final Steps
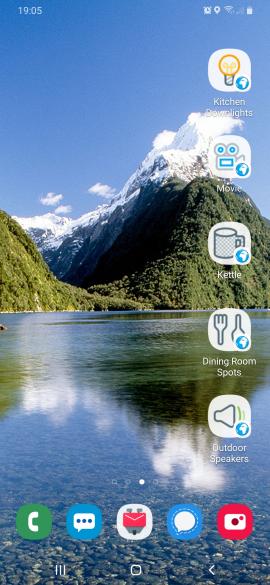
Once you’ve finished you can add the shortcut to the home screen via the long press menu on the main listing page. You can also export a copy of all your shortcuts via the settings page for use on another device. I don’t think this exports the values of your variables unless you checked the ‘Allow Share…’ advanced setting for the variable itself. This is most likely a good thing, since you’re going to want to use a different authentication token on each device.
I hope you’ve found this useful. I use these shortcuts every day and find them invaluable. The app has quite a bit more functionality which I haven’t covered here, including cURL import/export and processing of responses using Javascript.
For my regular readers, I apologise for the shorter post. It’s going to be a busy month coming up, but hopefully I’ll be back to my usual schedule soon. Thanks for sticking with me!
Leave a Reply