I recently bought a 3D printer in the form of a Creality Ender 3. I thought I would take the time to document how I got up and running, since this area is completely new to me. Hopefully this will be useful to those who are just starting out in 3D printing, specifically with the Ender 3. It’s not going to be a complete guide, but more of a high level overview of the steps I took. I’ll link to more detailed instructions where relevant.
About the Ender 3
The Ender 3 is a budget 3D printer from Creality 3D. It has a pretty standard feature set, including a heated bed. Levelling of the bed must be performed manually, but there are several addons which can automate this. The whole design of the printer has been made Open Source, including the firmware. There are also a whole load of 3D printed addons that can be added to the printer to improve its design and performance.
I opted for the base model with a glass bed as an additional addon. This was because I’ve heard of people having issues with warping of the metal build plate over time (and heat). The glass bed will always remain flat and avoid this issue. When I actually received the unit I saw that with the bundle I purchased I got the original flexible build surface as well. So I have the choice between the two. I also purchased a Raspberry Pi to host an Octoprint setup (which I haven’t got around to setting up yet) and three rolls of PLA filament. My filament took ages to arrive. I’d probably advise you to grab try and grab a bundle that includes a roll of filament if you want to get going quickly. The available bundles are always changing, so have a search around for the best deal.
Putting it Together
The printer arrived very quickly (just a few days). It comes in kit form and requires some assembly. This shouldn’t be difficult for anyone who’s put together anything moderately complex from a kit before. However, the instructions in the box leave something to be desired so I’d advise you to follow some of the 3rd party instructions available online. I was able to complete the build in 2-3 hours spread over a couple of weekday evenings.
Why You Should Upgrade the Firmware
The Ender 3 ships with an older version of the Marlin firmware. This lacks some features available in newer versions. Most notable of these is the lack of thermal runaway protection in the stock firmware. This is an important safety feature, which will cut power to the heating elements of the printer if the firmware detects that something is wrong. This can happen if some part of the heating or feedback systems becomes loose. I think it’s really important to upgrade the firmware on the device to the latest Marlin, since the stock firmware may literally burn your house down! Of course even with the latest firmware accidents can still happen, so this isn’t a substitute for taking other safety precautions!
The firmware upgrade process, whilst not trivial is easy enough for anyone whose programmed an Arduino or ESP8266. That’s because the Marlin firmware is itself an Arduino sketch! Basically, doing the update is a two step process. First we must flash the Arduino bootloader to the mainboard. This will then allow us to upload our new firmware (and any subsequent updates) via the printer’s USB port.
Performing the Upgrade
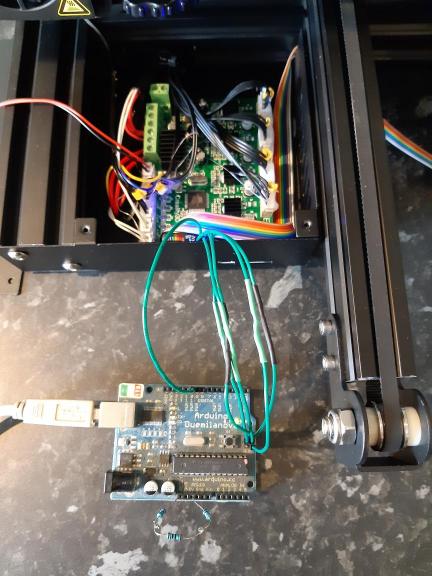
Flashing the bootloader is the most tricky part of this. It requires making some connections to the main board from another Arduino. This will act as the programming device (I used my old Arduino Duemilanove). I also found that I had to insert a 120 Ohm resistor between the 5V and ground pins of the Arduino to prevent it being reset when the IDE connected to it. This is because we want the reset to be passed through to the printer mainboard, not to reset the programming sketch on our Arduino. I couldn’t flash the bootloader from platformio, which is my preferred tool for doing Arduino stuff, so I had to download the latest version of the Arduino IDE.
Once the bootloader was flashed I cloned a copy of Marlin from Github, checked out the latest 1.x release and copied over the Ender 3 example configuration. I did a quick double check to make sure thermal runaway protection was enabled in the config. I was then able to build and flash the new firmware via platformio and the USB port on the printer.
This whole process is covered in much more detail in the following videos, which I used as a basis for getting this done:
Levelling the Bed
I found levelling the bed to be somewhat tricky. I think the main problem was that I kept getting the extruder too close to the bed which would inhibit the flow of plastic from the nozzle. However, after a few goes I was able to get it dialed in reasonably well. From the performance of the printer so far it looks like this doesn’t have to be perfect, just good enough. The following video shows the process that I followed:
First Prints
For my first print I just started one of the test gcode files that come on the SD card. This was supposed to be a pig. However, I knew that it wouldn’t complete because the only filament I had was the small amount which is supplied with the printer. I was mainly just wanting to see the printer running!
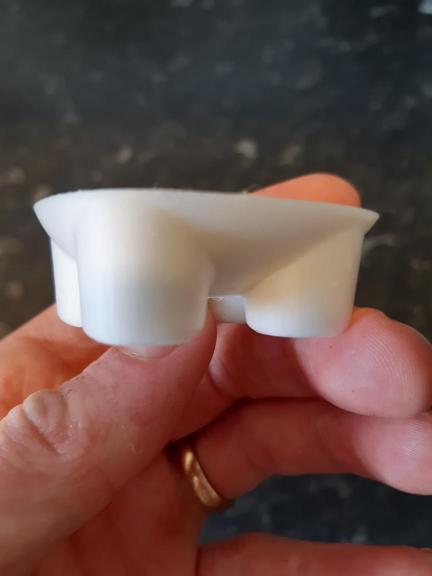
I had to wait another two weeks for the first of my rolls of filament to arrive, which was pretty frustrating. Once that arrived I sliced the 3DBenchy test model using Cura and printed it. To my dismay it didn’t come out as I expected on the first try:
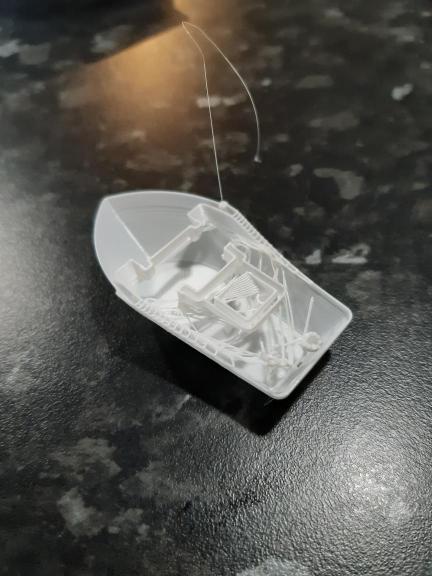
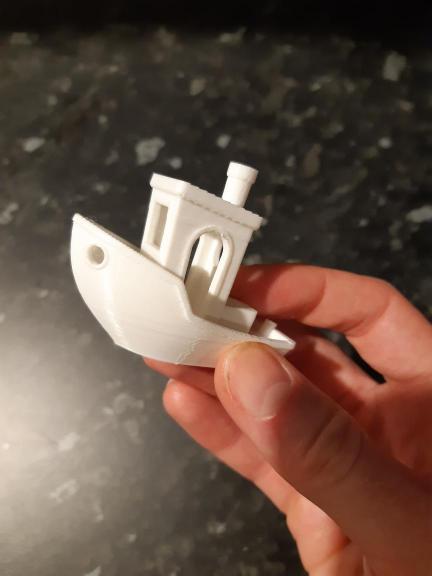
After a little bit of head scratching I realised that I had a Cura setting enabled from a previous model which I had been slicing. The specific setting was “Spiralize Outer Contour” A.K.A “Vase Mode”, which explains the issue. After disabling this setting and re-slicing, the resulting gcode produced a pretty nice Benchy in around 2 hours.
Conclusions
Since proving that the printer is functioning correctly with a decent benchy print, I’ve done a few other prints. I’ll probably cover some of these in future articles. For my regular readers – don’t worry! This isn’t going to turn into a 3D printing blog. However, there will be the occasional post on the subject (probably more than occasional in the next couple of months as I’m learning about it).
I’m actually really impressed with the whole 3D printing ecosystem and the Ender 3 specifically. I really like how my whole 3D printing pipeline is Open Source. This goes right from creating the models (with OpenSCAD, FreeCAD or Blender), through slicing (Cura) and down to the machine itself and the Marlin firmware (and Octoprint, eventually).
Coming back specifically to the Ender 3, I’m pleased with the print quality. So far I’ve only printed with a 0.2mm layer height, but it supports down to 0.1mm. The objects I’ve produced, whilst obviously 3D printed, are of good detail and finish and are very strong. Overall, I’d recommend this printer to anyone who has the technical know how to get it up and running and perform the required firmware update.
Next Steps
Print more things! I really love the feeling of holding an object which just didn’t exist a few hours before. I have a whole list of objects to print, including some upgrades to the printer. For some of these I’ve been waiting for my black filament to arrive, so I should be able to get on with them soon.
I also need to get my Octoprint setup completed. It’s actually mostly there, I just have a couple more configuration steps to go. I also want to print a case for the Pi, which will fit underneath the bed of the printer. I hope to report back on my progress with that pretty soon.
Leave a Reply