This is the first part in a multi-part series following my adventures in automating my self-hosting infrastructure with Ansible, running from Gitlab CI. In this post I’ll cover setting up my Ansible project, setting up the remote machines for Ansible/CI deployment, some initial checks in CI and automating of routine updates via our new system.
I’ve used Ansible quite extensively in the past, but with my recent focus on Docker and Gitlab CI I thought it was worth having a clean break. Also my previous Ansible configurations were a complete mess, so it’s a good opportunity to do things better. I’ll still be pulling in parts of my old config where needed to prevent re-inventing the wheel.
Since my ongoing plan is to deploy as many of my applications as possible with Docker and docker-compose, I’ll be focusing mainly in tasks relating to the host machines. Some of these will be set up tasks which will deploy a required state to each machine. Others will be tasks to automate routine maintenance.
Inventory Setup
Before we get started, I’ll link you to the Gitlab repository for this post. You’ll find that some of the files are encrypted with ansible-vault, since they contain sensitive data. Don’t worry though, I’ll go through them as examples, starting with hosts.yml.
The hosts.yml file is my Ansible inventory and contains details of all the machines in my infrastructure. Previously, I’d only made use of inventories in INI format, so the YAML support is a welcome addition. The basic form of my inventory file is as follows:
---
all:
  vars:
      ansible_python_interpreter: /usr/bin/python3
      ansible_user: ci
      ansible_ssh_private_key_file: ./id_rsa
  children:
    vms:
      hosts:
        vm1.mydomain.com:
          ansible_sudo_pass: supersecret
          password_hash: "[hashed version of ansible_sudo_pass]"
          # use this if the hostname doesn't resolve
          #ansible_host: [ip address]
        vm2.mydomain.com:
          ...
    rpis:
      # Uncomment this for running before the CI user is created
      #vars:
      #  ansible_user: pi
      hosts:
        rpi1.mydomain.com:
          ...
    physical:
      hosts:
        phys1.mydomain.com:
          ...
To create this file we need to use the command ansible-vault create hosts.yml. This will ask for a password which you will need when running your playbooks. To edit the file later, replace the create subcommand with edit.
As you can see we start out with the top level group called all. This group has several variables set to configure all the hosts. The first of these ensures that we are using Python 3 on each remote system. The other two set the remote user and the SSH key used for authentication. I’m connecting to all of my systems with a specific user, called ci, which I will handle setting up in the next section.
The remainder of the file specifies the remote hosts in the infrastructure. For now I’ve divided these up into three groups, corresponding to VMs, Raspberry Pis and physical host machines. It’s worth noting that a host can be in multiple groups, so you can pretty much get as complicated as you like.
Each host has several variables associated with it. The first of these is the password for sudo operations. I like each of my hosts to have individual passwords for security purposes. The second variable (password_hash) is a hashed version of the same password which we will use later when setting up the user. These hashes are generated with the mkpasswd command as per the documentation. The final variable (ansible_host) I’m using here is optional and you only need to include it if the hostname of the server in question can’t be resolved via DNS. In this case you can specify an IP address for the server here.
In order to use this inventory file we need to pass the -i flag to Ansible (along with the filename) on every run. Alternatively, we can configure Ansible to use this file by creating an ansible.cfg file in our current directory. To do this we download the template config file and edit the inventory line so it looks like this:
inventory = hosts.ymlSetting Up the Remote Machines
At this point you should comment out the ansible_user and ansible_ssh_private_key_file lines in your inventory, since we don’t currently have a ci user on any of our machines and we haven’t added the key yet. This we will take care of now – via Ansible itself. I’ve created a playbook which will create that user and set it up for use with our Ansible setup:
---
- hosts: all
  tasks:
    - name: Create CI user
      become: true
      user:
        name: ci
        comment: CI User
        groups: sudo
        append: true
        password: "{{ password_hash }}"

    - name: Create .ssh directory
      become: true
      file:
        path: /home/ci/.ssh
        state: directory
        owner: ci
        group: ci
        mode: 0700

    - name: Copy authorised keys
      become: true
      copy:
        src: ci_authorized_keys
        dest: /home/ci/.ssh/authorized_keys
        owner: ci
        group: ci
        mode: 0600
Basically all we do here is create the user (with the password from the inventory file) and set it up for access via SSH with a key. I’ve put this in the playbooks subdirectory in the name of keeping things organised. You’ll also need a playbooks/files directory in which you should put the ci_authorized_keys file. This file will be copied to .ssh/authorized_keys on the server, so obviously has that format. In order to create your key generate it in the normal way with ssh-keygen and save it locally. Copy the public part into ci_authorized_keys and keep hold of the private part for later (don’t commit it to git though!).
Now we should run that against our servers with the command:
ansible-playbook --ask-vault-pass playbooks/setup.ymlThis will prompt for your vault password from earlier and then configure each of your servers with the playbook.
Spinning Up the CI
At this point we have our ci user created and configured, so we should uncomment those lines in our inventory file. We can now perform a connectivity check to check that this worked:
ansible all -m pingIf that works you should see success from each host.
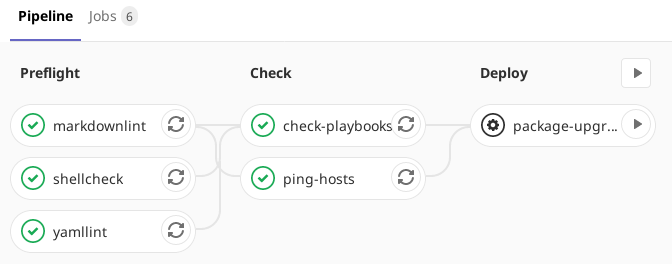
Next comes our base CI setup. I’ve imported some of my standard preflight jobs from my previous CI pipelines, specifically the shellcheck, yamllint and markdownlint jobs. The next stage in the pipeline is a check stage. Here I’m putting jobs which check that Ansible itself is working and that the configuration is valid, but don’t make any changes to the remote systems.
I started off with a generic template for Ansible jobs:
.ansible: &ansible
  image:
    name: python:3.7
    entrypoint: [""]
  before_script:
    - pip install ansible
    - ansible --version
    - echo $ANSIBLE_VAULT_PASSWORD > vault.key
    - echo "$DEPLOYMENT_SSH_KEY" > id_rsa
    - chmod 600 id_rsa
  after_script:
    - rm vault.key id_rsa
  variables:
    ANSIBLE_CONFIG: $CI_PROJECT_DIR/ansible.cfg
    ANSIBLE_VAULT_PASSWORD_FILE: ./vault.key
  tags:
    - ansible
This sets up the CI environment for Ansible to run. We start from a base Python 3.7 image and install Ansible via Pip. This takes a little bit of time doing it on each run so it would probably be better to build a custom image which includes Ansible (all the ones I found were out of date).
The next stage is to set up the authentication tokens. First we write the ANSIBLE_VAULT_PASSWORDvariable to a file, followed by the DEPLOYMENT_SSH_KEY variable. These variables are defined in the Gitlab CI configuration as secrets. The id_rsa file requires its permissions set to 0600 for the SSH connection to succeed. We also make sure to remove both these files after the job completes.
The last thing to set are a couple of environment variables to allow Ansible to pick up our config file (by default it won’t in the CI environment due to a permissions issue). We also need to tell it the vault key file to use.
Check Jobs
I’ve implemented two check jobs in the pipeline. The first of these performs the ping action which we tested before. This is to ensure that we have connectivity to each of our remote machines from the CI runner. The second iterates over each of the YAML files in the playbooks directory and runs them in check mode. This is basically a dry-run. I’d prefer if this was just a syntax/verification check without having to basically run through the whole thing, but there doesn’t seem to be a way to do that in Ansible.
The jobs for both of these are shown below:
ping-hosts:
  <<: *ansible
  stage: check
  script:
    - ansible all -m ping

check-playbooks:
  <<: *ansible
  stage: check
  script:
    - |
      for file in $(find ./playbooks -maxdepth 1 -iname "*.yml"); do
        ansible-playbook $file --check
      done
Before these will run on the CI machine, we need to make a quick modification to our ansible.cfg file. This will allow Ansible to accept the SSH host keys without prompting. Basically you just uncomment the host_key_checking line and ensure it is set to false:
host_key_checking = FalseDoing Something Useful
At this stage we have our Ansible environment set up in CI and our remote machines are ready to accept instructions. We’ve also performed some verification steps to give us some confidence that we are doing something sensible. Sounds like we’re ready to make this do something useful!
Managing package updates has always been a pain for me. Once you get beyond a couple of machines, manually logging in and applying updates becomes pretty unmanageable. I’ve traditionally taken care of this on a Saturday morning, sitting down and applying updates to each machine whilst having my morning coffee. The main issue with this is just keeping track of which machines I already updated. Luckily there is a better way!
[[Side note: Yes, before anyone asks, I am aware of the unattended-upgrades package and I have it installed. However, I only use the default configuration of applying security updates automatically. This is with good reason. I want at least some manual intervention in performing other updates, so that if something critical goes wrong, I’m on hand to fix it.]]
With our shiny new Ansible setup encased in a layer of CI, we can quite easily take care of applying package upgrades to a whole fleet of machines. Here’s the playbook to do this (playbooks/upgrades.yml):
---
- hosts: all
  serial: 2
  tasks:
    - name: Perform apt upgrades
      become: true
      when: ansible_distribution == 'Debian' or ansible_distribution == 'Ubuntu'
      apt:
        update_cache: true
        upgrade: dist
      notify:
        - Reboot

    - name: Perform yum upgrades
      become: true
      when: ansible_distribution == 'CentOS'
      yum:
        name: '*'
        state: latest
      notify:
        - Reboot

  handlers:
    - name: Reboot
      when: "'physical' not in group_names"
      become: true
      reboot:
This is pretty simple, first we apply it to all hosts. Secondly we specify the line serial: 2 to run only on two hosts at a time (to even out the load on my VM hosts). Then we get into the tasks. These basically run an upgrade selectively based upon the OS in question (I still have a couple of CentOS machines knocking around). Each of the update tasks will perform the notify block if anything changes (i.e. any packages got updated). In this case all this does is execute the Reboot handler, which will reboot the machine. The when clause of that handler causes it not to execute if the machine is in the physical group (so that my host machines are not updated). I still need to handle not rebooting the CI runner host, but so far I haven’t added it to this system.
We could take this further, for example snapshotting any VMs before doing the update, if our VM host supports that. For now this gets the immediate job done and is pretty simple.
I’ve added a CI job for this. The key thing to note about this is that it is a manual job, meaning it must be directly triggered from the Gitlab UI. This gives me the manual step I mentioned earlier:
package-upgrades:
  <<: *ansible
  stage: deploy
  script:
    - ansible-playbook playbooks/upgrades.yml
  only:
    refs:
      - master
  when: manual
Now all I have to do on a Saturday morning is click a button and wait for everything to be updated!
Conclusion
I hope you’ve managed to follow along this far. We’ve certainly come a long way, from nothing to an end to end automated system to update all our servers (with a little manual step thrown in for safety).
Of course there is a lot more we can do now that we’ve got the groundwork set up. In the next instalment I’m going to cover installing and configuring software that you want to be deployed across a fleet of machines. In the process we’ll take a look at Ansible roles. I’d also like to have a look at testing my Ansible roles with Molecule, but that will probably have to wait for yet another post.
I’m interested to hear about anyone else’s Ansible setup, feel free to share via the feedback channels!
Leave a Reply