Recently I set up continuous integration and deployment from my Home Assistant configuration. This setup has been nothing short of awesome! It’s liberated me from worrying about editing my configuration – all I do is git push and relax. Either HASS will notify me when it restarts or I’ll get an email from Gitlab telling me the pipeline failed.
I wanted to take this configuration further and expand it to other parts of my Home Automation infrastructure. In this post I’ll cover expanding it to perform deployments of my HA stack with Docker, building and deploying to ESPHome devices and unit testing and deploying my AppDaemon apps.
Let’s get on with it!
Automating Docker Deployment
I’d originally held off doing this because I wasn’t looking forward to building custom Docker images in Gitlab CI. However, I managed to complete the original pipeline without having to add any extra dependencies to the HASS containers (such as git which I thought may be required). This makes the job of deploying my HA stack much easier, especially as I already had it mostly scripted. The first step was to add my update.sh script to my repo and tweak it to suit:
#!/bin/bash
set -e

cd /mnt/docker-data/home-assistant || exit
docker-compose -p ha pull
docker-compose -p ha down
docker-compose -p ha up -d --remove-orphans
docker system prune -fa
docker volume prune -f
exit
This is a pretty simple modification to my previous script. The main additions are that I use the -p argument to set the project name used by docker-compose. By default this is taken from the directory name, but I wanted it to match the name of my previous project even though the directory has changed from ha to home-assistant. The other main modification is that I’ve added the --remove-orphans argument to clean up any lingering containers. This is useful if I remove a container from the docker-compose.yml file. In addition I’ve removed the apt commands and cleaned up the script a bit so that it passes my shellcheck job.
The next step was simply to add the docker-compose.yml file to the repo. Then I continued by editing the CI configuration.
Updated Home Assistant CI Jobs
I first split up my previous deployment job into two jobs. The first of these is the main deployment job which pulls the new configuration. The second restarts HASS. The restart job goes in a new pipeline stage and will only be run when the docker-compose.yml or update.sh files haven’t changed:
deploy:
  stage: deploy
  image:
    name: alpine:latest
    entrypoint: [""]
  environment:
    name: home-assistant
  before_script:
    - apk --no-cache add openssh-client
    - echo "$DEPLOYMENT_SSH_KEY" > id_rsa
    - chmod 600 id_rsa
  script:
    - ssh -i id_rsa -o "StrictHostKeyChecking=no" $DEPLOYMENT_SSH_LOGIN "cd /mnt/docker-data/home-assistant && git fetch && git checkout $CI_COMMIT_SHA && git submodule sync --recursive && git submodule update --init --recursive"
  after_script:
    - rm id_rsa
  only:
    refs:
      - master
  tags:
    - hass

restart-hass:
  stage: postflight
  image:
    name: alpine:latest
    entrypoint: [""]
  environment:
    name: home-assistant
  before_script:
    - apk --no-cache add curl
  script:
    - "curl -X POST -H \"Authorization: Bearer $DEPLOYMENT_HASS_TOKEN\" -H \"Content-Type: application/json\" $DEPLOYMENT_HASS_URL/api/services/homeassistant/restart"
  only:
    refs:
      - master
  except:
    changes:
      - docker-compose.yml
      - update.sh
  tags:
    - hass
I then added another job (again in another pipeline stage) which performs our Docker deployment. This will be run only when either the docker-compose.yml or update.sh files changes:
docker-deploy:
  stage: docker-deploy
  image:
    name: alpine:latest
    entrypoint: [""]
  environment:
    name: home-assistant
  before_script:
    - apk --no-cache add openssh-client
    - echo "$DEPLOYMENT_SSH_KEY" > id_rsa
    - chmod 600 id_rsa
  script:
    - ssh -i id_rsa -o "StrictHostKeyChecking=no" $DEPLOYMENT_SSH_LOGIN "cd /mnt/docker-data/home-assistant && ./update.sh"
  after_script:
    - rm id_rsa
  only:
    refs:
      - master
    changes:
      - docker-compose.yml
      - update.sh
  tags:
    - hass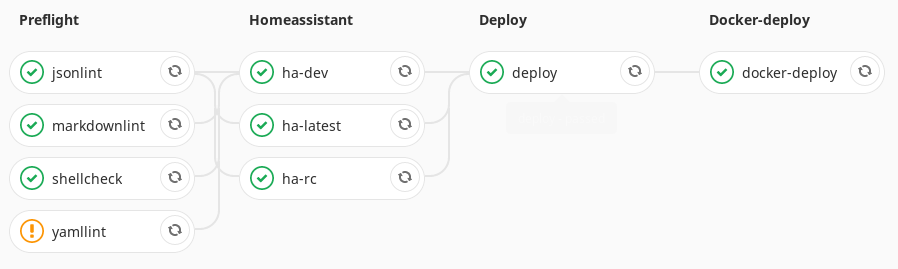
With that in place I can now redeploy my HA stack by modifying either of those files, committing to git and pushing. In order to facilitate HASS updates with this workflow, I changed the tag of the HASS Docker image to the explicit version number. That way I can simply update the version number and redeploy for each new release.
Continuous Integration for ESPHome
Inspired by the previous configs I have seen for checking ESPHome files, I wanted to implement the same checks. However, I wanted to go further and have a full continuous deployment setup which would build the relevant firmware when its configuration was changed and send an OTA update to the corresponding device. As it turned out this was relatively easy.
I started out by importing my ESPHome configs into Git, which I hadn’t previously done. You can find the resulting repository on Gitlab. For the CI configuration I first copied over the markdownlint and yamllint jobs from my Home Assistant CI configuration.
I then borrowed the ESPHome config check jobs from Frenck’s configuration. These check against both the current release of ESPHome and the next beta release. The beta release job is allowed to fail and is designed only to provide a heads up for potential future issues.
Then I came to implement the build and deployment job. Traditionally these would be performed in separate steps, but since ESPHome can do this in a single step with it’s run subcommand I decided to do it the easy way. This also removes the requirement to manage build artifacts between steps. I created the following template job to manage this:
# Generic deployment template
.esphome-deploy: &esphome-deploy
  stage: deploy
  variables:
    PYTHONPATH: "/usr/src/app:$PYTHONPATH"
  image:
    name: esphome/esphome:latest
    entrypoint: [""]
  before_script:
    - apt update && apt install -y git-crypt openssl
    - |
      openssl enc -aes-256-cbc -pbkdf2 -d -in git-crypt.key.enc -out \
          git-crypt.key -k $OPENSSL_PASSPHRASE
    - git-crypt unlock git-crypt.key
    - esphome dummy.yaml version
  after_script:
    - rm -f git-crypt.key
  retry: 2
  tags:
    - hass
Most of the complexity here is in unlocking the git-crypt repository so that we can read the encrypted secrets file. I opted to store the git-crypt key in the repository, encrypted with openssl. The passphrase used for openssl is in turn stored in a Gitlab variable, in this case $OPENSSL_PASSPHRASE. Once the decryption of the key is complete, we can unlock the repo and get on with things. We remove the key after we are done in the after_script step.
Per-Device Jobs
Using the template configuration, I then created a job for each device I want to deploy to. These jobs are executed only when the corresponding YAML file (or secrets.yaml) is changed. This ensures that I only update devices that I need to on each run. The general form of these jobs is:
my_device:
  <<: *esphome-deploy
  script:
    - esphome my_device.yaml run --no-logs
  only:
    refs:
      - master
    changes:
      - my_device.yaml
      - secrets.yaml
Of course you need to replace my_device with the name of your device file.

With these jobs in place I have a full end-to-end pipeline for ESPHome, which lints and checks my configuration before deploying it only to devices which need updating. Nice! You can check out the full pipeline configuration on Gitlab. I now no longer have need to run the ESPHome dashboard, so I’ve removed it from my server.
Continuous Integration for AppDaemon
I mentioned previously that I wanted to split out my AppDaemon apps and configuration into a separate repo from my HASS config. I did this as a prerequisite step of this setup and you can again find the new repo on Gitlab.
The inspiration for this configuration came mostly to @bachya on the HASS forum, whose post in reply to my earlier setup provided most of the details. Thanks for sharing!
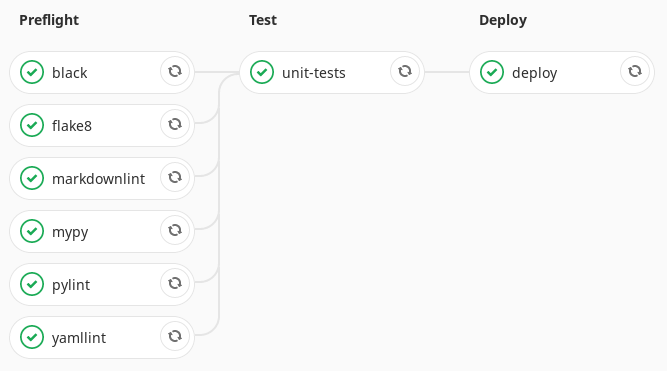
I started out by copying across the now ubiquitous markdownlint and yamllint jobs. I then added jobs for pylint, mypy, flake8 and black:
pylint:
  <<: *preflight
  image:
    name: python:3
    entrypoint: [""]
  before_script:
    - pip install pylint
    - pylint --version
    - mv fake_secrets.yaml secrets.yaml
  script:
    - pylint --rcfile pylintrc apps/

mypy:
  <<: *preflight
  image:
    name: python:3
    entrypoint: [""]
  before_script:
    - pip install mypy
    - mypy --version
    - mv fake_secrets.yaml secrets.yaml
  script:
    - mypy --ignore-missing-imports apps/

flake8:
  <<: *preflight
  image:
    name: python:3
    entrypoint: [""]
  before_script:
    - pip install flake8
    - flake8 --version
    - mv fake_secrets.yaml secrets.yaml
  script:
    - flake8 --exclude=apps/occusim --max-line-length=88 apps/

black:
  <<: *preflight
  image:
    name: python:3
    entrypoint: [""]
  before_script:
    - pip install black
    - black --version
    - mv fake_secrets.yaml secrets.yaml
  script:
    - black --exclude=apps/occusim --check --fast apps/
Although this ends up being very verbose, I decided to implement these all as separate jobs so that I get individual pass/fail states for each. I’m also pretty sure the mypy job doesn’t do anything right now, because I’m not using any type hints in my Python code. However, the job is there for when I start adding those.
Unit Testing AppDaemon
Another thing that @bachya introduced me to was Appdaemontestframework. This provides a pytest based framework for unit testing your AppDaemon apps. Although I’m still working on the unit tests for my so far pretty minimal AD setup I did manage to get the framework up and running, which was a little tricky. I had some issues with setting up the initial configuration for the app, but I managed to work it out eventually.
The unit testing CI job is pretty simple:
# Unit test jobs
unit-tests:
  stage: test
  image:
    name: acockburn/appdaemon:latest
    entrypoint: [""]
  before_script:
    - pip install -r apps/test/test_requirements.txt
    - py.test --version
    - mv fake_secrets.yaml secrets.yaml
  script:
    - py.test
  tags:
    - hass
All we do here is install the requirements that I need for the tests and then call py.test. Easy!
The deployment job for AppDaemon was also trivial, since it is pretty much a copy of the HASS one. Since AD detects changes to your apps automatically, there’s no need to restart. For more details you can check out the full CI pipeline on Gitlab.
Conclusion
Phew, that was a lot of work, but it was all the logical follow on from work I’d done before or that others had done. I now have a full set of CI pipelines for the three main components of my home automation setup. I’m really happy with each of them, but especially the ESPHome pipeline. As an embedded engineer in my day job I find it really cool that I can update a YAML file locally, commit/push it and then my CI takes over and ends up flashing a physical device! That this is even possible is a testament to all the pieces of software used.
Next Steps
I’m keen to keep going with CI as a means of automating my operations. I think my next target will be sprucing up my Ansible configurations and running them automatically from CI. Stay tuned for that in the hopefully near future!
Leave a Reply