This is an update to my previous post on my wall mounted Home Assistant tablet. There have been quite a few changes, so I thought it was worth another post on the subject. Let’s get into it…
Power Failure
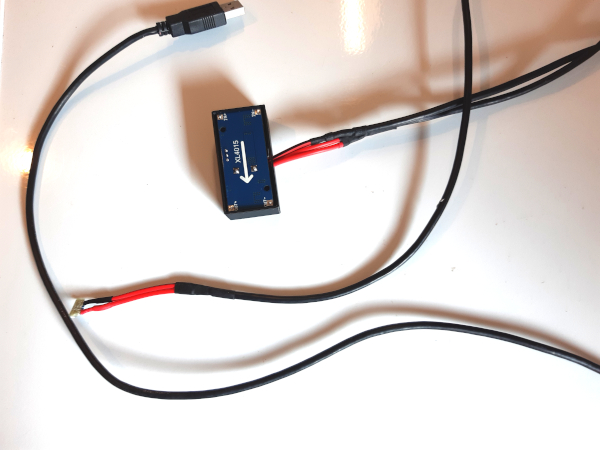
I’ll start with the big issue which has plagued this project – power. Since the battery in the original tablet was completely exhausted I had built a wired power supply to replace it. Unfortunately, this wasn’t powerful enough and the tablet would power off sometimes under high load. This problem seemed to get worse until the tablet would power off after just a few minutes, thus becoming pretty much useless.

I mentioned previously that I had ordered a 5A power supply to fix this problem, but even that didn’t work. The tablet must pull transient currents of more than 5A, which a battery can supply quite easily. Unfortunately the fixed power supply cannot. This is a real shame because I put a lot of effort into the new power supply – I even printed a case for it based on a modified version of the parametric PCB case I used in my recent MySensors build.
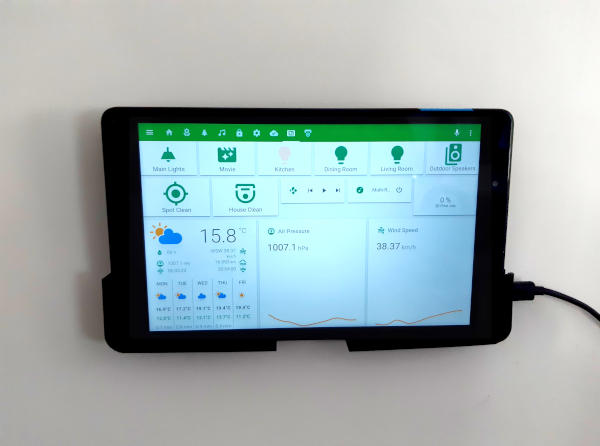
Even with the failure of the new power supply, the exercise in building this has demonstrated the utility of a wall mounted tablet in our household. The decision was therefore taken to replace the old broken tablet with a new one.
The New Tablet
The new tablet is the Lenovo Tab E8 (link is to Amazon, but ours came from a local retailer), chosen solely because it was the cheapest 8 inch tablet available!

The tablet seems pretty good overall, at least for the price. The build quality is fine, although the case is very plastic-y. It’s a little slow after boot up as it loads up everything, but in normal usage as a wall mounted dashboard it performs perfectly well. The shipped operating system is Android 7.0, which is up to date enough to not present any problems with app support.
The biggest issue with this device is that it charges really slowly, even from the provided charger. I even had cases when setting it up that the battery would still drain when plugged in to the charger. I was a little concerned that the tablet battery would become discharged over time during normal use, due to wake ups from the motion sensing. However, once the tablet was mounted on the wall and left overnight it charged to 100% and has remained there since.
Fixing the Brackets
I printed new brackets for the tablet with a reduced front lip. This removes the issue with the brackets obscuring the screen. The right bracket (left from the point of view of the tablet and in the STL files) also has a cut out in it’s side to allow the USB cable to pass through. I made these edits in OpenSCAD, by first importing the original STL files. I then created an object which represents the material I wanted to remove. Then a difference operation between the two gives the final object. I’m pretty pleased with them. The only thing I wasn’t able to reproduce was the rounded internal edges on the cut out sections.
Wall Panel MQTT Integration
With the power issues solved, I can integrate the tablet fully with Home Assistant (without fear that the extra load will cause it to power off). I’ve integrated in the sensors available on this device (pretty much just the power status). The full YAML code for this is available on GitLab. This pretty much went according to the WallPanel documentation. However, I did find that I needed to specify a value_template in order to extract the battery value:
sensor:
  - platform: mqtt
    state_topic: "wallpanel/kitchen/sensor/battery"
    name: "Kitchen WallPanel Battery Level"
    unit_of_measurement: "%"
    value_template: '{{value_json.value}}'
    device_class: battery
To extract the boolean status for the charging state sensors, the template gets a little more complex:
binary_sensor:
  - platform: mqtt
    state_topic: "wallpanel/kitchen/sensor/battery"
    name: "Kitchen WallPanel Charge State"
    value_template: '{% if value_json.charging %}ON{% else %}OFF{% endif %}'
    device_class: power

  - platform: mqtt
    state_topic: "wallpanel/kitchen/sensor/battery"
    name: "Kitchen WallPanel AC State"
    value_template: '{% if value_json.acPlugged %}ON{% else %}OFF{% endif %}'
    device_class: plug
I also integrated in the motion, face detection and QR code sensors, although I’m not using the face detection or QR code sensors and have since disabled them in WallPanel.
sensor:
  - platform: mqtt
    state_topic: "wallpanel/kitchen/sensor/qrcode"
    name: "Kitchen QR Code"
    value_template: '{{value_json.value}}'

binary_sensor:
  - platform: mqtt
    state_topic: "wallpanel/kitchen/sensor/motion"
    name: "Kitchen Motion"
    payload_on: '{"value":true}'
    payload_off: '{"value":false}'
    device_class: motion

  - platform: mqtt
    state_topic: "wallpanel/kitchen/sensor/face"
    name: "Kitchen Face Detected"
    payload_on: '{"value":true}'
    payload_off: '{"value":false}'
    device_class: motion
The final integration I did was to add a switch to turn on and off the camera streaming. However, in general usage this seems a bit flakey, with the camera stream not usually becoming available until after a WallPanel restart. Here’s the YAML used for the switch anyway:
switch:
  - platform: mqtt
    command_topic: "wallpanel/kitchen/command"
    name: "Kitchen Camera State"
    payload_on: '{"camera": true}'
    payload_off: '{"camera": false}'
    optimistic: true
    retain: true
Dashboard Improvements

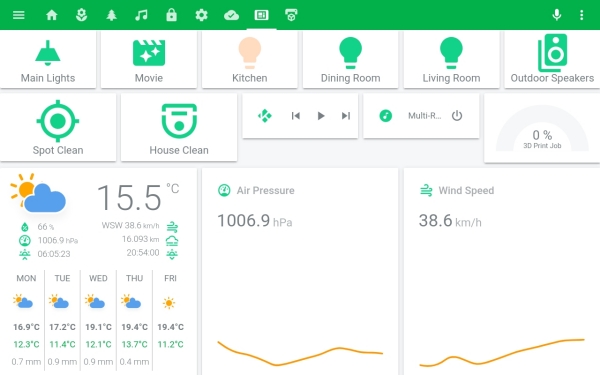
I’ve improved my dashboard somewhat since my last post. However, it’s still a long way from some of the awesome dashboards I’ve seen posted. It’s still a work in progress!
The main changes have been to switch to the animated weather custom card for the weather forecast and to add Custom Header to my install to compact the header. I then added more buttons, some media controls and a gauge showing the progress of my 3D prints. The vacuum buttons call some custom scripts to start the vacuum with our preferred settings. This is necessary to work around a bug in HASS with the Botvac D3:
script:
  spot_clean:
    alias: "Spot Clean"
    sequence:
      - alias: "Start spot clean"
        service: vacuum.neato_custom_cleaning
        data:
          entity_id: vacuum.marvin
          mode: 2
          category: 3

  house_clean:
    alias: "House Clean"
    sequence:
      - alias: "Start house clean"
        service: vacuum.neato_custom_cleaning
        data:
          entity_id: vacuum.marvin
          mode: 1
          category: 2
It should be noted that I’m running a slightly older version of HASS at the moment. In newer versions the service name changed to neato.custom_cleaning. Also, using a category value of 3 for spot cleaning appears to be undocumented, but if you look at the library, that’s what it’s doing.
Conclusions
This setup is now working perfectly and all the problems with the previous iteration have been resolved. It’s unfortunate that this was done by throwing money at the problems, but sometimes things just don’t work out as we hope!
Overall, I’m really happy with the finished product. The dashboard will be continually developing as I come up with ideas and work out what’s useful and what isn’t. Feel free to share your ideas again via the feedback channels.
Leave a Reply