In my previous article on the Traccar GPS tracking software, I lamented the state of my broken internal HTTPS/TLS setup. I’ve known that using DNS validation for Let’s Encrypt was the way to fix this for some time. However, that required me to migrate my DNS to another provider, because my provider (Namecheap) only allow API access if you have a large enough account. Since I wrote that article, I’ve been investigating this further and have found my solution in the form of Linode‘s Domains Service. As I’m already using Linode for hosting my cloud servers (including this website) this is the perfect option for me.
The application which prompted me getting this sorted was bitwarden_rs, which I really didn’t want to run over plain HTTP and also didn’t want to expose to the outside world. I’d recommend the excellent Self Hosted Home article on this as a getting started point if you’d like to deploy it.
Migrating my DNS to Linode
For a job that I wasn’t looking forward to, this migration couldn’t have gone better. The main issue I encountered was that I wasn’t able to import my records over directly from Namecheap, but I think that’s a problem at their end rather than Linode’s. I ended up copying over the records one by one, which was easier than I expected since I didn’t have as many records as I thought.
One other minor issue that I ran into was the SOA email address that I had to add. Weirdly I never had to specify this with Namecheap. The problem stemmed from the fact that Linode will not allow you to use an address from the same domain for this. I contacted Linode support about this because it seemed contrary to their docs. They responded incredibly quickly (time measured in minutes, over a weekend too) and said that is so you can be notified about problems with your domain. This makes sense, but it is a little annoying. In the end I created another third party (gmail, boo!) address for this and forwarded it back to my main self hosted account. I also added it as a secondary account on my phone, just in case.
Getting an API Token
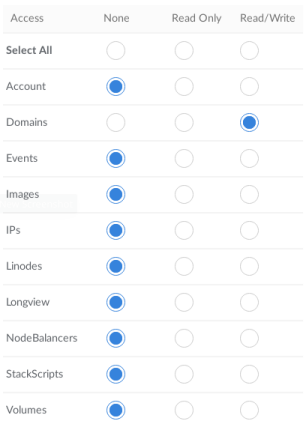
In order to perform the DNS-01 certificate validation with Linode, your client software needs to create a temporary DNS record. This requires an API token to authenticate to the Linode Domains API. This token can be created from the Linode Manager. The only permission required is read/write access to the Domains service, as per the screenshot below:

Setting Up Traefik
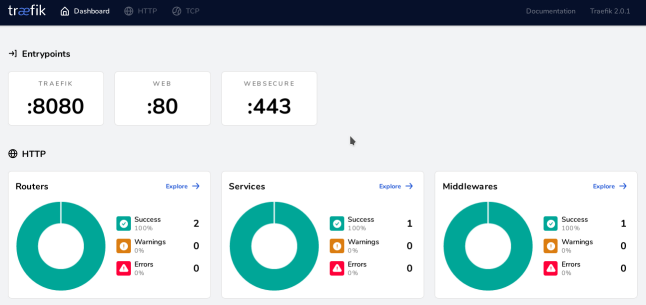
I wanted to use Traefik as my reverse proxy for this, given my previous success with it. This was massively complicated by the fact that Traefik 2.0 was released just a few days ago. This release introduces a lot of changes both in concepts and configuration, which make Traefik significantly more complex. I was able to work through these changes, but it took me a while to work it all out!

The Traefik setup I ended up with was as follows (in docker-compose.yml):
---
version: '3'

services:
  traefik:
    image: traefik:v2.0
    command:
      - "--accesslog=true"
      - "--api.insecure=true"
      - "--providers.docker=true"
      - "--providers.docker.exposedbydefault=false"
      - "--entrypoints.web.address=:80"
      - "--entrypoints.websecure.address=:443"
      - "--certificatesresolvers.mydnschallenge.acme.dnschallenge=true"
      - "--certificatesresolvers.mydnschallenge.acme.dnschallenge.provider=linodev4"
      - "--certificatesresolvers.mydnschallenge.acme.email=insertemailaddress"
      - "--certificatesresolvers.mydnschallenge.acme.storage=/letsencrypt/acme.json"
    volumes:
      - /mnt/docker-data/traefik:/letsencrypt
      - /var/run/docker.sock:/var/run/docker.sock
    ports:
      - "80:80"
      - "443:443"
      - "8080:8080"
    environment:
      - LINODE_TOKEN=insertlinodetoken
    networks:
      - external
    restart: always
Obviously, you need to insert your email address and Linode API token in the relevant places. Make sure not to include quotes around the API token, since these will be passed into the container and make the token invalid. This appears to be some weird and surprising behaviour in docker-compose.
This configuration sets up Traefik with a DNS challenge certificate resolver called mydnschallenge. This needs to be specified in the configuration for each service that you want to use it with. This is done by adding following labels to your service in docker-compose.yml:
labels:
      - 'traefik.enable=true'
      - "traefik.http.routers.myservice.rule=Host(`myservice.internal.example.com`)"
      - "traefik.http.routers.myservice.entrypoints=websecure"
      - "traefik.http.routers.myservice.tls.certresolver=mydnschallenge"
      - "traefik.http.services.myservice.loadbalancer.server.port=8080"
These labels first enable Traefik for the container in question. Then we add a new router called myservice and specify that it should be attached to the websecure entrypoint at the hostname given. We then add our mydnschallenge as the TLS certificate resolver. Finally, I specify the backend port on which this service listens – this isn’t required if it just listens on port 80.
With this in place you should be able to successfully get a certificate and then access your service over HTTPS. For me this took a few minutes the first time for the DNS to refresh, but this won’t be an issue for future renewals.
HTTP to HTTPS Redirects with Traefik 2.0
So far our service is available only via HTTPS. If you’ve followed the above configuration for Traefik then it is also listening on port 80 for plain HTTP. However, you will receive a 404 error if you try to access your service via HTTP. What we want to do is the traditional redirect from HTTP to HTTPS.
This turns out to be a little more complex in Traefik 2.0 than in previous versions and requires a little understanding of some new concepts. Traefik 2.0 introduces the concept of middlewares, which can operate on a request as it passes between the router and the backend service. One such middleware is the redirectscheme, which will do exactly what we need. Adding the following labels to your service container will do the trick:
      - "traefik.http.middlewares.myservice_redirect.redirectscheme.scheme=https"
      - "traefik.http.routers.myservice_insecure.rule=Host(`myservice.internal.example.com`)"
      - "traefik.http.routers.myservice_insecure.entrypoints=web"
      - "traefik.http.routers.myservice_insecure.middlewares=myservice_redirect@docker"
Here we create the middleware myservice_redirect before adding another router (myservice_insecure). This router is attached to the web entrypoint at our hostname, making it available on port 80. Finally we add the myservice_redirect middleware to our new router and we are done! It’s pretty simple when you understand it the concepts.

Conclusion
This solves the problem of internal HTTPS perfectly for me! I’m looking forward to migrating other internal services over to this arrangement. Of course, the configuration presented here only works with Traefik and not other software such as Nginx or Mosquitto. There are other options here which support the Linode API for DNS validation. However, since Traefik 2.0 supports arbitrary TCP services I think I’m going to give that a try for my MQTT server. It’s one less piece of software to maintain!
I’m really happy with how my DNS migration went and how well this all works with the Linode Domains service. It’s nice to discover another aspect to a service that I’ve been using for so long.
I hope you find this setup useful, or perhaps you’ve already solved this problem in a different way. Please feel free to let me know in the feedback channels.
Leave a Reply