One of the outstanding issues I’ve had with my Home Automation system in recent months has been to fix my presence detection. I was using a combination of Owntracks and SNMP to query my Pfsense firewall for devices on the network.
This worked well until my Owntracks setup broke due to internal network changes. This was due to moving separating my HA/MQTT server from the reverse proxy. In turn, this meant that the MQTT server wasn’t able to renew it’s Let’s Encrypt certificate.
The solution to this would have been to use DNS validation to get the certificate issued. However, my DNS provider (Namecheap) don’t allow API access unless you have a large enough account with them.
Eventually I will migrate my DNS to a supported provider and get internal TLS working. However, it’s quite a bit of work to migrate over. Also, DNS is pretty critical to the operation of, well, everything – so I want to take my time and get it right. In the meantime I was looking into other options for GPS based presence detection.
GPS Based Presence Options
Aside from using Owntracks in MQTT mode, it also supports HTTP mode (which is now actually the recommended mode). This is directly supported in HASS. I hadn’t switched over to it because I wanted to try out the Owntracks recorder for logging position data over time. Sending data to both HASS and the recorder would be difficult via HTTP. However, it’s exactly the use case that MQTT is made for!
While I was dithering around not doing very much about this problem, another alternative cropped up: Traccar. Traccar is a self-hosted GPS tracking system which supports a multitude of different devices and has mobile apps available for both major OSes. The main plus point for me is that it is a stand-alone server which I could host in my DMZ. There is also a Home Assistant integration for Traccar.
Installation
It seems to be rather badly documented, but there is an official Docker image for Traccar on Docker Hub. When reading that documentation I initially thought I had to build the image myself. Don’t! Just use the official one (unless you have a good reason not to).
I followed along the instructions in the Readme, until it came to the final docker run command, where I wanted to put it into docker-compose. Here’s what I came up with:
---
version: '3'

services:
  traccar:
    image: traccar/traccar:latest
    restart: always
    ports:
      - "8082:8082"
      - "5000-5150:5000-5150"
      - "5000-5150:5000-5150/udp"
    volumes:
      - "/mnt/docker-data/traccar/logs:/opt/traccar/logs:rw"
      - "/mnt/docker-data/traccar/data:/opt/traccar/data:rw"
      - "/mnt/docker-data/traccar/traccar.xml:/opt/traccar/conf/traccar.xml:rw"
This is pretty much the command in the docs translated over, except for the second to last line. This mounts the data volume needed for persisting the default H2 database files to the host. I’m not sure why this isn’t mentioned in the docs. Perhaps they expect that you will use Mysql for the database, but I didn’t want to do that for my initial test setup.

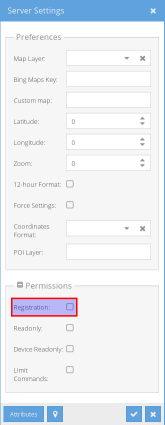
After running the docker-compose up -d command I had Traccar working on port 8082 of my server and was able to log in as the default user (admin and password admin!). The first thing I did after logging in was change that password and disable user registration, before exposing my instance via the reverse proxy.

I found that the server memory usage was reasonably high, which seems to be due to the memory options passed to the Java VM in the dockerfile. There doesn’t seem to be any way to change this except for building a custom image.
Reverse Proxy Setup
I’m intending to migrate the reverse proxy on my home network to Traefik at some point after my previous success with it. However, for now it’s still running good old Nginx. I couldn’t find an example Nginx config for Traccar, so I copied my HASS one and modified it to suit:
server {
    # Update this line to be your domain
    server_name traccar.example.com;

    # Ensure these lines point to your SSL certificate and key
    ssl_certificate /etc/letsencrypt/live/traccar.example.com/fullchain.pem;
    ssl_certificate_key /etc/letsencrypt/live/traccar.example.com/privkey.pem;

    # Ensure this line points to your dhparams file
    ssl_dhparam /etc/nginx/ssl/dhparams.pem;

    # These shouldn't need to be changed
    listen 443 ;
    add_header Strict-Transport-Security "max-age=31536000; includeSubdomains";
    ssl on;
    ssl_protocols TLSv1 TLSv1.1 TLSv1.2;
    ssl_ciphers "EECDH+AESGCM:EDH+AESGCM:AES256+EECDH:AES256+EDH:!aNULL:!eNULL:!EXPORT:!DES:!MD5:!PSK:!RC4";
    ssl_prefer_server_ciphers on;
    ssl_session_cache shared:SSL:10m;

    proxy_buffering off;

    location / {
        # Update the address of your backend server here
        proxy_pass http://backend-server:8082;
        proxy_set_header Host $host;
        proxy_redirect http:// https://;
        proxy_http_version 1.1;
        proxy_set_header X-Forwarded-For $proxy_add_x_forwarded_for;
        proxy_set_header Upgrade $http_upgrade;
        proxy_set_header Connection $connection_upgrade;
    }
}
Adding Devices
Once your server is up and running, adding devices is easy. Just click the plus icon next to devices and give your device a name. For the ID field, the Android app will generate a six-digit identifier, which you can copy over. This ID is the only security token used to update the position, so you may like to use something more secure. I recommend generating a pseudo-random string with pwgen and using that.
Set up on the app side is pretty trivial too. Just enter the full URL to the server e.g. https://traccar.example.com and make sure the device identifier matches the one you entered on the server. Toggling the service status will then start sending location updates. The Android app seems to put an annoying persistent notification in the notification pull down. For some reason this doesn’t go into the ongoing section (which would make it less annoying). I just hid the notifications from the Traccar app via the relevant Android setting and the app still sends location updates.
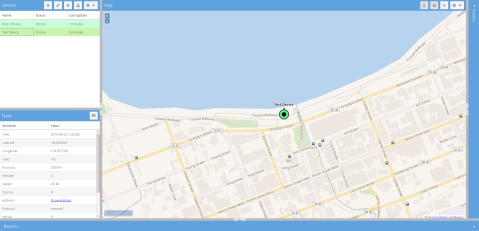
As an aside, you can easily send location updates from the command line with curl, for example I made the screenshot above by artificially positioning a device at New Plymouth’s Wind Wand:
curl -X POST "https://<insert-hostname>/?id=<insert-device-id>&lat=-39.056056&lon=174.071736&hdrop=0&altitude=4&speed=0"Make sure to update the hostname and device ID to match your setup and update the other fields to reflect the position you want to log.
Integrating Traccar with Home Assistant
The integration with HASS also proved to be relatively easy and works well. There were a couple of things which tripped me up, which I’ll come to shortly. First we need an entry for Traccar in our Home Assistant config:
device_tracker:
  - platform: traccar
    host: !secret traccar_host
    port: 443
    username: !secret traccar_user
    password: !secret traccar_password
    ssl: true
The port and ssl variables are required for the above setup with the reverse proxy, aside from that it’s reasonably obvious.
After adding that to my config file, I expected my devices just to show up in HASS. They didn’t. This turned out to be due to two problems. The first of these was that I had created a user in Traccar specifically for Home Assistant (which you can give read-only permissions, nicely). However, this user didn’t have access to my devices. The solution is to grant access via the ‘Devices’ panel of the user management panel (the icon looks like two little picture frames).
The second issue tripped me up for a bit longer. Even after I set the permissions correctly, I still couldn’t see my devices in the HASS UI. It turns out they were being added to the known_devices.yaml on the server, but not being enabled by default. It wasn’t until I logged into the server and checked this file that I noticed this. This is more problematic if you are editing your config locally and deploying it via git since the change obviously won’t be made to your local copy.
In the end I added the entry in my local copy and deployed it to the server:
robs_phone:
  hide_if_away: false
  icon:
  mac:
  name: Rob
  picture:
  track: true
Once that was done for each device, the Traccar device_tracker entities appeared in Home Assistant just fine.
Battery Usage Issues
Now comes the big potential problem: the power usage of the Traccar Android app. The first day I had this installed my phone was down to 15% by 9-10pm. However, the results have been less worrying over the last couple of days. I’m not sure why it was so bad for the first day, although there were a few points that were different from my subsequent usage:
- I was using the version from F-Droid. After noticing the battery issue I switched to the version from the play store. I don’t know if that version uses some proprietary Google Services API, or if they are identical. However, it is a possible reason for the difference.
- I had changed a couple of the default settings – I lengthened the frequency setting to 15 minutes and changed the distance setting to 50 meters. I’m not sure what effect/interactions these have since I can’t find any documentation about them. I’ve since gone back to the default settings.
- I moved around quite a bit that first day (some driving around town and a long walk) with less moving in the subsequent two days. If this is really the reason for the battery usage then that would be disappointing. Obviously not moving is not a solution!
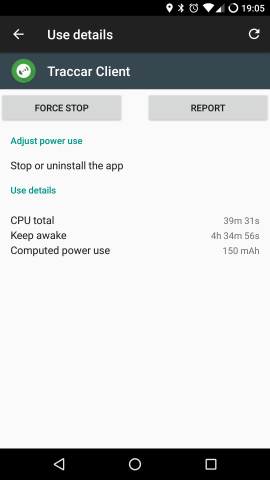
This is all based on three days of usage, so I’m going to continue monitoring the situation and potentially testing other variations in settings. I’ve asked about the battery usage on the Traccar forum, but have so far had no answer. One worrying issue is that the Android battery usage panel shows the app as keeping the device awake for long periods.

There is another option to the Traccar app, since OwnTracks can also be used. However, at this point you may as well just use the HASS integration directly, unless you want the extra features of the Traccar server.
Conclusion
Traccar seems like a pretty solid piece of software, though due to the power issue I’m not completely sold on it yet. The location updates are certainly more frequent than OwnTracks was (at least over MQTT). The server side UI is nice and responsive and there are quite a few capabilities that I haven’t explored yet. For these reasons I’m going to stick with it for now and continue testing.
Next Steps
Obviously I need to solve the battery issues in order to go much further. If the usage proves acceptable after further testing I’m also going to see if I can dial down the memory usage of the server by editing the Dockerfile.
I also have quite a bit of work to do on the HASS presence detection front. I’d specifically like to try a combination of Bayesian Sensors and the “Not so Binary” approach.
Hopefully I can come up with something which is both responsive to changes and also robust against false readings. I’ll be sure to write a post about that when I do. However, that’s it for now. Thanks for reading!
Leave a Reply