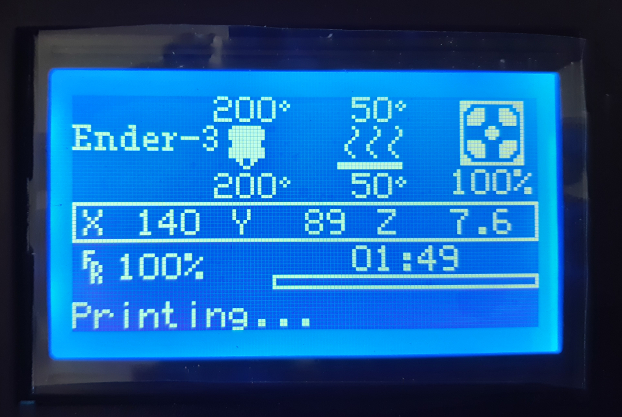
Over the last week, I’ve been continuing my 3D printing journey by getting my Octoprint system up and running. I’ve also been integrating Octoprint with Home Assistant. One of the annoyances I encountered along the way is that the Ender 3 will accept power over the USB connection. This is useful for programming, but annoying in normal use. This means that the control board to the printer and the display will always be powered when the Raspberry Pi running Octoprint is powered up, even if the printer power supply is powered down. In order to solve this, I began looking into ways of switching the power of the USB ports on the Pi 4. The solution I found is more generally useful in home automation.
If you’ve followed my approach to home automation, you’ll know I make heavy use of the Raspberry Pi in my media systems and elsewhere. The latest addition of the Octoprint systems brings the number of Pis in the house to five. Most of these have some kind of USB peripheral plugged into them. Being able to power cycle a misbehaving peripheral without interrupting other operations on the device or trying to reach into whatever crevice hosts the Pi is very useful. This approach also opens up more avenues when integrated with Home Assistant. Dumb USB devices can now be powered off and on easily.
Some of this post it relevant to a stand-alone Home Assistant based setup and the rest is more relevant to Octoprint. I’ve tried to separate the two parts so you can skip the sections you’re not interested in.
Getting Started
The key to this is a utility called hub-ctrl.c, which as it sounds is a utility for controlling USB hubs, in a single C file. There is also a package in the raspbian repositories called uhubctl, but in my testing this didn’t work with the Raspberry Pi 4. hub-ctrl.c must be compiled from source, but since it’s a single C file this is trivial. The following commands will download, compile and install it along with it’s dependencies:
$ sudo apt install libusb-dev build-essential git
$ git clone https://github.com/codazoda/hub-ctrl.c.git
$ cd hub-ctrl.c
$ gcc -o hub-ctrl hub-ctrl.c -lusb
$ sudo mv hub-ctrl /usr/local/bin/
Once this process is complete you can start playing around with your USB ports (use the -h flag to see the arguments). Passing the -v flag will show a detailed listing of the current port status.
In my experiments I found that the power to my ports would not shut off unless I individually powered down all the ports on hub’s 1 and 2. It’s possible that this would interfere with the Ethernet if it were in use, but it’s perfectly fine over wifi. Basically it seems that the USB implementation on the Pi 4 is somewhat buggy. The upshot of this is that I must also power down the attached USB webcam. This adds some complications to my scripts later. It’s worth trying this on some of the other Pi models to see what the experience there is like.
I implemented the following script to power down the USB ports (in /usr/local/bin/psu_off.sh):
#!/bin/bash

systemctl stop webcamd
sleep 2

hub-ctrl -h 2 -P 1 -p 0
hub-ctrl -h 2 -P 2 -p 0
hub-ctrl -h 2 -P 3 -p 0
hub-ctrl -h 2 -P 4 -p 0
hub-ctrl -h 1 -P 1 -p 0
There is also a corresponding power up script (/usr/local/bin/psu_on.sh):
#!/bin/bash

hub-ctrl -h 2 -P 1 -p 1
hub-ctrl -h 2 -P 2 -p 1
hub-ctrl -h 2 -P 3 -p 1
hub-ctrl -h 2 -P 4 -p 1
hub-ctrl -h 1 -P 1 -p 1

sleep 2
systemctl start webcamd
The systemctl lines in there are for stopping and starting the webcam service, due to the aforementioned issue. You’ll either want to substitute in any services that may be dependent on the USB devices (and won’t detect the disconnect/reconnect) or just remove these lines.
Permissions
The hub-ctrl tool typically needs running via sudo. Since we’re going to want to run this tool from another system we should allow our normal user permission to do this without a password. You may even want to create a new user just for this purpose if you really want to lock down this ability.
To allow the use of our scripts without a password run the command sudo visudo /etc/sudoers.d/usb-power and add the following contents:
pi ALL=NOPASSWD: /usr/local/bin/psu_on.sh
pi ALL=NOPASSWD: /usr/local/bin/psu_off.sh
Of course you can update the username here if you opted to use another user. For my later use case with Octoprint, I need to use the Pi user.
Integrating with Home Assistant
We can integrate this with Home Assistant via a command line switch:
switch:
  - platform: command_line
    switches:
      pi4_usb_power:
        command_on: /usr/bin/ssh -i /config/id_rsa -o StrictHostKeyChecking=no pi@IP_ADDR sudo psu_on.sh
        command_off: /usr/bin/ssh -i /config/id_rsa -o StrictHostKeyChecking=no pi@IP_ADDR sudo psu_off.sh
You’ll obviously need to substitute in the address of your Pi as well as set the path to your SSH key. This key should be installed on the Pi. Right now I’ve left this open so this key can execute any command within the permissions of the Pi user. If you want to lock this down you need the ability to execute multiple remote commands. Follow this ServerFault thread to implement this.
Integrating with Octoprint
If you just came for the USB power switching with Home Assistant, you can skip the next couple of sections and go to the conclusion. However, if you are interested in Octoprint and getting it better integrated with HASS read on!
This approach can easily be integrated into Octoprint via the PSU Control plugin. This allows us to control the status of the USB power directly within Octoprint. To make this work nicely, we need to give Octoprint some idea of the status of the power supply. It would be nice to do this by checking the USB power state and reporting it back. However, I decided to cheat and use the status of the webcam service! Here’s the resulting script (/usr/local/bin/psu_status.sh):
#!/bin/bash

status=$(systemctl is-active webcamd)

if [[ $status = "active" ]]
then
    exit 0
else
    exit 1
fi
We then simply set up the plugin to use our three scripts:
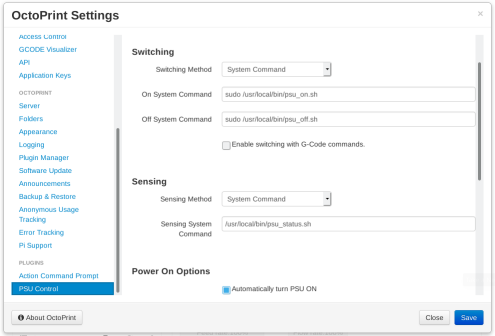
With that in place, you should be able to switch your USB power on and off via the little lightning bolt icon at the top of your Octoprint screen. It’s worth noting that the status script can also be integrated into the HASS switch above by adding the command_state item to it’s configuration.
I’m eventually going to add relay control to my printer to control the main power supply. At this point I’ll update my scripts to also control the relay. I’ll probably query the state of the relay for the status script as well. When I do this, I’ll update this post with the details. In the meantime the following video describes the hardware side of it (as well as a more basic software setup):
Switching the Octoprint PSU from Home Assistant
Now that we have our scripts integrated with Octoprint we can one-up our integration with HASS by using the Octoprint API to switch the USB power on and off:
switch:
  - platform: command_line
    switches:
      octoprint_psu:
        command_on: '/usr/bin/curl -s -H "Content-Type: application/json" -H "X-Api-Key: OCTOPRINT_API_KEY" -X POST -d ''{ "command":"turnPSUOn" }'' http://IP_ADDR/api/plugin/psucontrol'
        command_off: '/usr/bin/curl -s -H "Content-Type: application/json" -H "X-Api-Key: OCTOPRINT_API_KEY" -X POST -d ''{ "command":"turnPSUOff" }'' http://IP_ADDR/api/plugin/psucontrol'
        command_state: '/usr/bin/curl -s -H "Content-Type: application/json" -H "X-Api-Key: OCTOPRINT_API_KEY" -X POST -d ''{ "command":"getPSUState" }'' http://IP_ADDR/api/plugin/psucontrol'
        value_template: '{{ value.isPSUOn }}'
I decided to continue using the command line switch here, rather than a REST switch. This was because the REST switch requires state feedback via a GET call, which the Octoprint API doesn’t support. Instead we are calling the API via curl, which works fine. Don’t forget to update the code to include your IP address/hostname and also your Octoprint API key. You probably even want to have the whole command in the secrets.yaml file in order to protect these when sharing your config (since HASS doesn’t support templating in secrets).
Bonus: Shutting Down Octoprint from HASS
Now that we have a feel for the Octoprint API, we can use it in HASS to do other things. For example, it’s useful to be able to shutdown the server when we are done with it:
shell_command:
  octoprint_shutdown: '/usr/bin/curl -s -H "Content-Type: application/json" -H "X-Api-Key: OCTOPRINT_API_KEY" -X POST http://IP_ADDR/api/system/commands/core/shutdown'
This is basically the same as above and you can call any API method you like with this approach. To actually make use of this, it needs to be added to a script or automation. For example:
script:
  octoprint_shutdown:
    sequence:
      - service: shell_command.octoprint_shutdown
This can then be added to the HASS UI to get a nice button to shut down the system. You probably want to add a condition on this for real world use, in order to prevent the server being shutdown while a print is in progress. I’m going to leave this as an exercise for the reader!
Conclusion
With this in place I’ve made the use of my 3D printer via Octoprint a little more streamlined. It’s also nice that the USB power switching is more generally useful. I’m sure I’ll find other applications for it in future, since I didn’t know that it was possible until now.
As you can see from the above, I’m aiming for a deeper integration between HASS and my 3D printer than is provided via just the native Octoprint integration. This is just step one. I’m hoping to eventually automate some of the safety procedures and best practices around running the printer, such as ensuring that it is turned off when not in use and possibly even an emergency shutdown. I’ll be sure to update you on the progress of these in future articles.
Leave a Reply