Road to Docker Part 2

My Road To Docker – Part 2: My Home Automation Stack

This post may contain affiliate links. Please see the disclaimer for more information.

This post is part of a series on this project. Here is the series so far:


In my first post of this series, I outlined my plan to convert my infrastructure over to a layered setup. This would consist of virtual machines (in various VLANs), with most of the services running in Docker. This post details the second stage of my road to Docker, although really was is the first stage since I’m writing these out of order! I actually converted my home automation systems over to Docker before tackling the web stack.

The motivation behind upgrading the home automation system first was to do it at the same time as I did a large update to Home Assistant, since I’d been holding back on updating. The main reason for this was the switch to Lovelace as the default UI, which I was dreading. As it turned out, I waited long enough for the awesome HASS developers to make all my problems go away (or at least the Lovelace related ones).

System Summary

I’ve written about my home automation setup before, but here is a brief recap of what I’m running (only the server side stuff):

I had also been running InfluxDB and Grafana. However, something broke in my setup and I hadn’t got around to fixing it. I therefore decided to cut my losses with that and not reinstall it (for now).

Finding Docker Images

Luckily for me, the four main components of my system all have official/recommended Docker images available. This was useful as I’m always pretty reticent to use some questionably maintained image from the Docker Hub, mainly due to the lack of security updates. I also wanted to avoid building custom Docker images for now, until I work out a decent update strategy.

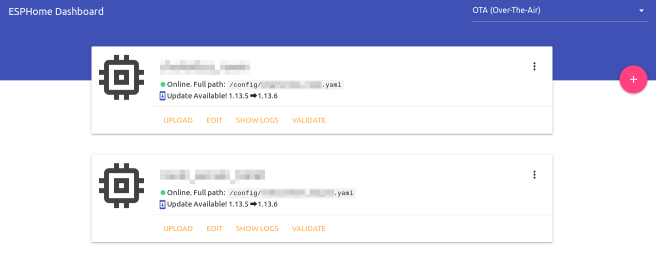
In addition to the four services above I wanted to run the ESPHome dashboard in order to manage my devices better. I had previously just been using the command line tool to build and upload to them. This also has an official Docker image.
Road to Docker Part 2
Looks like I have a few devices to update!

I also ended up running a MaryTTS container to replace PicoTTS that I had been running for my voice announcements. This is due to the lack of PicoTTS inside the HASS Docker image. It was recommended that I use the silversniper/marytts image. Looking at this image, it hasn’t been updated in three years which. This reinforces my point about random images from Docker Hub. Luckily, this isn’t an externally facing application so it isn’t too critical from a security standpoint. However, I think I’ll look into updating that at some point.

Stacking Containers, again…

I set up a new clean VM inside my home automation VLAN. I was a little reserved about doing this, since it means everything in that VLAN (most of which is blocked from the internet) can see the full HA server. However, my main worry over not doing that was the mDNS used by ESPHome. If I can get Avahi/mDNS working across VLANs at some point I will move it. I still have a big network re-organisation to do, so hopefully it will get done then.

The full docker-compose.yml file for my new stack is given below:

version: '3'

services:
  mosquitto:
    image: eclipse-mosquitto
    restart: always
    ports:
      - 1883:1883
      - 8883:8883
      - 9001:9001
    volumes:
      - /mnt/docker-data/mosquitto/config:/mosquitto/config
      - /mnt/docker-data/mosquitto/data:/mosquitto/data
      - /mnt/docker-data/mosquitto/logs:/mosquitto/logs

  zigbee2mqtt:
    image: koenkk/zigbee2mqtt
    volumes:
      - /mnt/docker-data/zigbee2mqtt:/app/data
    devices:
      - /dev/ttyACM0:/dev/ttyACM0
    depends_on:
      - mosquitto
    restart: always
    network_mode: host

  homeassistant:
    image: homeassistant/home-assistant
    volumes:
      - /mnt/docker-data/home-assistant:/config
      - /etc/localtime:/etc/localtime:ro
    depends_on:
      - mosquitto
    restart: always
    network_mode: host

  nodered:
    image: nodered/node-red-docker:v8
    ports:
      - 1880:1880
    volumes:
      - /mnt/docker-data/node-red:/data
      - /etc/localtime:/etc/localtime:ro
    depends_on:
      - mosquitto
      - homeassistant
    restart: always

  esphome:
    image: esphome/esphome
    volumes:
      - /mnt/docker-data/esphome:/config
    restart: always
    network_mode: host

  marytts:
    image: sliversniper/marytts
    ports:
      - 59125:59125
    volumes:
      - /etc/localtime:/etc/localtime:ro
      - /mnt/docker-data/marytts/lib/voice-dfki-poppy-hsmm-5.2.jar:/marytts/marytts-5.1.2/lib/voice-dfki-poppy-hsmm-5.2.jar:ro
    restart: always

There’s nothing particularly earth shattering here. The main point of interest is that I mount the voice file for my preferred MaryTTS voice inside the container. Actually finding the voices is a little interesting. The official way to download them is a GUI tool that won’t run inside the container. I eventually found the XML file which lists all the available voices and extracted the URL of the one I wanted (the online demo helps to decide).

The only other parts worth noting are that I mount all my volumes under /mnt/docker-data, which is an NFS share onto the ZFS array of the virtual machine host. This then gets rolled into my normal backups. I also didn’t bother with a reverse proxy for any of this, since I already have one for HASS sitting in my DMZ (yet to be Dockerised). The other services just get accessed via the machine hostname and port since they are only used internally.

Sometimes Waiting Pays

I didn’t run into any issues particular to setting this up in Docker. At this point I think it’s a pretty well trodden path and this setup is pretty much standard. I did however run into several issues with upgrading to the latest Home Assistant.

First, lets tackle the elephant in the room – Lovelace. I was really worried going into this that it was going to be a huge amount of work. My mind was somewhat put at rest by seeing the UI editor in action via misperry’s video. When I actually came to it, the migration process automatically re-created my existing UI pretty much perfectly. Lesson learned: there is something to be said for waiting for mature software, rather than jumping on the new shiny thing immediately!

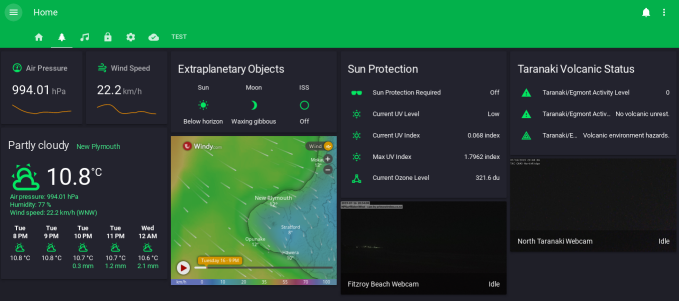
Lovelace itself is awesome! The ease of configuration has made me actually focus on making my HASS UI nicer rather than just the bare minimum I could get away with that I had previously. In the screenshot below, you can see my new “Outdoors” panel. This contains weather information, outdoor related sensor readings and a couple of local webcam views.
Road to Docker Part 2
I probably should have taken this screenshot during the day

Remaining Issues

Most of my remaining issues were due to the Home Assistant “Great Migration”. This resulted in a load of entity IDs changing in various components. Obviously, this resulted in my having to update my configuration to change all the names. It took a little while to troubleshoot. This was because if the changed name is used in an automation, the automation has to actually fire to cause an error. In many cases it also just won’t fire, if the name is used in the triggers for the automation.

The final major issue I encountered, was with my frankly awesome vacuuming robot, which appeared to stop reacting to service calls in HASS. The underlying issue appears to be the Botvac D3 returning a different error message than the D7 that the library was tested with. So far this hasn’t been fixed, but I’m currently using the category: 2 workaround suggested and that’s working fine. I think I’ll have a look into fixing that issue and submit a PR when I get time.

Managing Updates

Managing updates to Docker images has always been an bit of an issue for me. In the past I’ve used Watchtower with some success. However, due to the capacity for breaking changes I want to manage HASS updates more carefully. It was suggested to me to just use a bash script which I can run periodically to do this. This isn’t something that had occurred to me before, probably because it’s so simple! Here’s the script I’m using:

#!/bin/bash
set -e

cd /mnt/docker-data/stacks/ha
sudo apt update
sudo apt upgrade -y
sudo apt autoremove -y
sudo apt clean
docker-compose pull
docker-compose down
docker-compose up -d
docker system prune -fa
docker volume prune -f
exit

This works beautifully and allows me to easily keep up with release to HASS and the other components, once I’ve verified that it’s reasonably safe to update.

Conclusion and Next Steps

Overall I’m pretty happy with how this move has turned out. Once the initial teething issues were all worked out the system has been very stable. I’m appreciating the extra utility of the ESPHome dashboard, which makes it very convenient to update my devices. It’s also great to be back on the latest version of Home Assistant.

In terms of next steps, I would like to give InfluxDB and Grafana another try. My main issue here has always been building the dashboards. It seems to be pretty tricky to get something both good looking and useful in Grafana. I also haven’t seen any pre-built dashboards for use with data from Home Assistant. Perhaps this is because they are so peculiar to individual setups.

I also have an LXD container running ZoneMinder. I’d like to re-deploy this as a Docker container on the same VM. Previously, I’ve not had too much luck running ZoneMinder in Docker. I’ll to see if the situation has improved when I tackle this migration.

I’m not actively working on any further migrations of other services to Docker at the moment, so there will probably be a break in this series for now. However, given my current success I’ll definitely be continuing on with this migration. I just want to work on some other projects for a while!

If you liked this post and want to see more, please consider subscribing to the mailing list (below) or the RSS feed. You can also follow me on Twitter. If you want to show your appreciation, feel free to buy me a coffee.

My Road to Docker: Traefik

My Road to Docker – Part 1: My Web Stack

This post may contain affiliate links. Please see the disclaimer for more information.

This post is part of a series on this project. Here is the series so far:


I’ve been following and using Docker since it’s early days. I think 0.6 was one of the first releases I tried. That said, I’ve never actually had that much luck getting it deployed on meaningful parts of my infrastructure. Usually, I would start some new deployment of something with the intention of using Docker. Then I’d hit some issue which made it difficult (or at least more difficult than it should be). Either that, or I’d run some Docker containers as a testing deployment for a while and then pull them down. It’s safe to say my road to Docker has been long, winding and full of potholes!

Recently, I’ve been giving my infrastructure choices more thought. My main goals are that I want to reduce maintenance and keep the high level of separation and security I have between my different services. As detailed in my last post on my self hosting setup, I’ve been using LXD fairly successfully. The problem with this is really that LXD containers are more like virtual machines. Each container is a little Linux system which needs to be kept up to date, monitored and generally looked after. When you have one container per service this becomes a chore. In actuality I don’t have one LXD container per service. Instead I group dependent services such as databases with their parent. However, I’ve still ended up with quite a few containers.

Decisions, decisions…

I really like the separation I’m able to have by keeping my LXD containers on separate VLANs. Docker does support this via macvlan, but the last time I played with it I had to manually assign IPs to each container. It looks like Docker will now do this automatically. However, it allocates from it’s own IP pool and won’t use your DHCP server. This means I can’t assign IPs from my Pfsense firewall. Also having one public (LAN) IP per Docker service kinda sucks and I also don’t want to rely on just one project for the security of my system.

Additionally, I have the need to run at least one VM anyway for my virtualised Pfsense firewall. This brings me to the idea of running Docker inside VMs. Each VM can be assigned to the relevant VLAN interface and get it’s IP from DHCP. I also get the benefit of two levels of isolation using different technologies. I haven’t yet decided on whether to use Proxmox or Ubuntu Server+Libvirt+Cockpit for the host systems. Hopefully this will be the subject of a future post.

On To Today

All the above is pretty much background, because I actually don’t want to talk about my locally hosted stuff today. Instead I’m going to talk about my stuff in the cloud – specifically the hosting for this site.

I’ve used Linode since around 2011 when I set up my self hosted mail server. Since this time, I’ve hosted this site on a fairly standard LAMP setup on that same server. The mail server install is now getting on a bit, but being CentOS based it’s all still supported for updates until next year. However, in preparation for re-building the mail server I decided to move the web stuff out onto another server and run it in Docker. This basically gives me the same setup of Docker-on-VM as I have on my local infrastructure. Just the hypervisor UI differs – it’s all KVM underneath.

Since I was moving the site to a new server, I also decided to move closer to my audience. According to my Matomo statistics this is predominantly US based. To this end I span up a new $5 Linode (Nanode), running Ubuntu 18.04 in their New Jersey datacenter. This should also be pretty fast for European visitors (to be honest it’s lightning fast even from NZ).

Getting Going

After doing some pretty standard first 10 minutes on a server stuff, I set about installing Docker. Instead of installing via my usual method of adding the APT repository I decided to see how installing from a Snap would work in production:

$ sudo snap install docker

A few seconds later Docker was installed. However, I ran into a wrinkle when trying to add myself to the Docker group. Basically, it wouldn’t allow me to run Docker commands without root access (still). The solution is to add the Docker group before installing the Snap, so I removed it, added the group and reinstalled. So full instructions for installing Docker via Snap should more accurately be:

$ sudo addgroup --system docker
$ sudo adduser $USER docker
$ newgrp docker
$ sudo snap install docker

Stacking Containers

I’d resolved to install the blog inside the official WordPress container and connect use mariadb for the database. Since I was moving my install over, it was slightly more complex than it would be for a clean install, but this article put me on the right track.

The main issue I encountered didn’t happen until I had the site running and was trying to get HTTPS running. Due to Let’s Encrypt’s HTTP verification this had to be done after the DNS settings were updated i.e. the site was live. This issue manifested as WordPress serving HTTP URLs for all links and embedded content. This leads to mixed content warnings/blocks in Firefox and Chrome. The issue seems to be common to any setup where HTTPS is handled by a reverse proxy. Basically, in this setup WordPress isn’t aware that it should be using HTTPS and needs to be told. Adding the following to wp-config.php fixes the problem:

$_SERVER['HTTPS']='on';

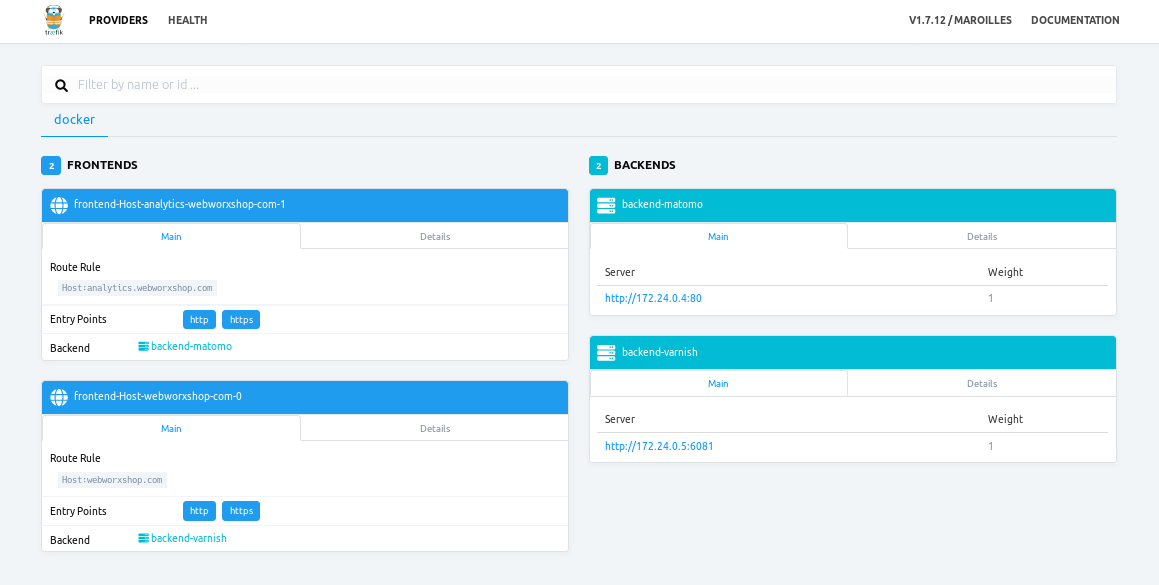
I decided to use Traefik as my reverse proxy, which I’m quite pleased with. The automated service discovery is pretty awesome and will really come into it’s own on my other self hosted infrastructure. I also whacked a Varnish cache (from this Docker image) in between. So far I haven’t done much with Varnish, but it’s there for when I get time to tweak it.

Moving Matomo

I also moved my Matomo Analytics instance to the new server using the official Docker image. This gave me much less trouble than WordPress since I just allowed it to use the embedded Matomo version with my configuration file and database from the old install.

I connected Matomo up directly to my Traefik instance, without running it through Varnish, to avoid any potential issues with the cache interfering with my statistics. Traefik just worked with this setup, which was pretty refreshing.

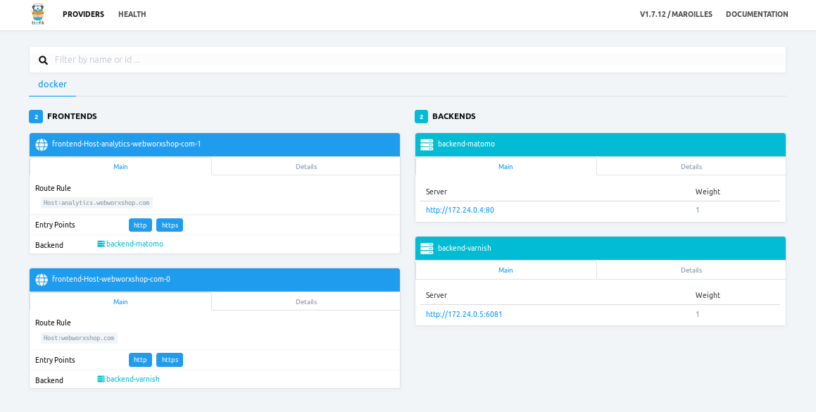
My Road to Docker: Traefik
My Traefik Dashboard

PSA: Docker will Ignore Your Firewall!

Along the way, I ran into another issue. Before I changed the DNS settings to make the site live, I was binding Traefik to port 8080 and accessing it via an SSH tunnel for making changes in WordPress. Since I had configured UFW to block everything (except SSH) when I set up the server, I thought this was a nice secure setup for debugging.

I was wrong.

I only noticed something was off because I happened to have the log output from Traefik open and saw random IPs in the logs. Luckily, the only virtual host I had configured at that point was localhost:8080 so all the unwanted visitors got 404 responses. Needless to say I pulled down all the containers until I could work out what was going on.

This appears to be a known interaction between Docker and any firewall utility (including both UFW and Firewalld). The issue is inherent in the way that Docker uses iptables to route traffic to your containers. Basically, the port forwarding rules go in the NAT chain in iptables. This means incoming traffic is re-routed before it hits the INPUT chain containing the rules from UFW/Firewalld.

I tried the fix suggested – disabling iptables support in Docker, but this completely broke inter-container connectivity (unsurprising, when you think about it). My solution for now is just to be really careful when binding ports. Make sure that any ports you don’t want to give access to the outside world are bound only to 127.0.0.1. There is also the DOCKER-USER iptables chain if you need more flexibility, but it means you need to use raw iptables rules.

This issue is a major security flaw and needs to be given more attention. Breaking administrator expectations of security like this is going to lead to loads of services being exposed to the big bad Internet that really shouldn’t be!

My Full Web Stack

Below is the docker-compose.yml file for my full web stack. I store any secret variables in an env.sh file which I source before running my docker-compose commands.

version: '3'
 
services:
  traefik:
    image: traefik:latest
    volumes:
      - /home/rob/docker-data/traefik/traefik.toml:/etc/traefik/traefik.toml
      - /home/rob/docker-data/traefik/acme.json:/etc/traefik/acme.json
      - /var/run/docker.sock:/var/run/docker.sock
    ports:
      - "80:80"
      - "443:443"
      - "127.0.0.1:8080:8080"
    networks:
      external:
        aliases:
          - webworxshop.com
          - analytics.webworxshop.com
    restart: always

  varnish:
    image: wodby/varnish:latest
    depends_on:
      - wordpress
    environment:
      VARNISH_SECRET: ${VARNISH_SECRET}
      VARNISH_BACKEND_HOST: wordpress
      VARNISH_BACKEND_PORT: 80
      VARNISH_CONFIG_PRESET: wordpress
      VARNISH_ALLOW_UNRESTRICTED_PURGE: 1
    labels:
      - 'traefik.enable=true'
      - 'traefik.backend=varnish'
      - 'traefik.port=6081'
      - 'traefik.frontend.rule=Host:webworxshop.com'
    networks:
      - external
    restart: always

  wordpress:
    image: wordpress:apache
    depends_on:
      - mariadb-wp
    environment:
      WORDPRESS_DB_HOST: ${WP_DB_HOST}
      WORDPRESS_DB_USER: ${WP_DB_USER}
      WORDPRESS_DB_PASSWORD: ${WP_DB_USER_PASSWD}
      WORDPRESS_DB_NAME: ${WP_DB_NAME}
    volumes:
      - /home/rob/docker-data/wordpress:/var/www/html
    networks:
      - external
      - internal
    restart: always
 
  mariadb-wp:
    image: mariadb
    environment:
      MYSQL_ROOT_PASSWORD: ${WP_DB_ROOT_PASSWD}
      MYSQL_USER: ${WP_DB_USER}
      MYSQL_PASSWORD: ${WP_DB_USER_PASSWD}
      MYSQL_DATABASE: ${WP_DB_NAME}
    volumes:
      - /home/rob/docker-data/mariadb-wp/init/webworxshop.com.sql.gz:/docker-entrypoint-initdb.d/backup.sql.gz
      - /home/rob/docker-data/mariadb-wp/data:/var/lib/mysql
    networks:
      - internal
    restart: always

  matomo:
    image: matomo:apache
    depends_on:
      - mariadb-matomo
    volumes:
      - /home/rob/docker-data/matomo:/var/www/html
    labels:
      - 'traefik.enable=true'
      - 'traefik.backend=matomo'
      - 'traefik.port=80'
      - 'traefik.frontend.rule=Host:analytics.webworxshop.com'
    networks:
      - external
      - internal
    restart: always
 
  mariadb-matomo:
    image: mariadb
    environment:
      MYSQL_ROOT_PASSWORD: ${MATOMO_DB_ROOT_PASSWD}
      MYSQL_USER: ${MATOMO_DB_USER}
      MYSQL_PASSWORD: ${MATOMO_DB_USER_PASSWD}
      MYSQL_DATABASE: ${MATOMO_DB_NAME}
    volumes:
      - /home/rob/docker-data/mariadb-matomo/init/analytics.webworxshop.com.sql.gz:/docker-entrypoint-initdb.d/backup.sql.gz
      - /home/rob/docker-data/mariadb-matomo/data:/var/lib/mysql
    networks:
      - internal
    restart: always

networks:
  external:
  internal:

This is all pretty much as described, however there are two notable points:

  • I went for separate mariadb containers for the databases for WordPress and Matomo. This is because the official mariadb container only supports creation of one database/user via environment variables. I’m not super happy with this arrangement, but it is working well and doesn’t seem to use too much memory.
  • The aliases portion under the network configuration for the Traefik container allow the other containers to route internal requests back to themselves. This helps with things such as the loopback check in WordPress, which will otherwise fail.

That’s pretty much all there is to it!

Conclusion

Overall, I’m really happy with the way this migration has worked out. I’ve even been able to downgrade the Linode plan for the original server to the $5/month plan, since it now has less load. This means I’m paying the same as I was for the single server for two servers, although with half the RAM each. I think I paid an extra $2-3 during the migration period, since that took me a while to compete. Even that isn’t too bad.

I’ve already started on further Docker migrations on some of the infrastructure I have on my home servers. These should be the subject of further posts.

If you liked this post and want to see more, please consider subscribing to the mailing list (below) or the RSS feed. You can also follow me on Twitter. If you want to show your appreciation, feel free to buy me a coffee.