In my recent post about my networking setup I mentioned that my firewall is a virtualised pfSense system running on a Proxmox host. In the comments to that post I was also asked if I was making use of Open vSwitch. Since the answer is that I use Open vSwitch in my pfSense/Proxmox setup, I thought I’d write up my setup for those that are interested.
I’ve actually been meaning to write this up for a long time. I’ve had this setup running since shortly after we moved into this house. On the one hand this means that the setup is pretty battle tested. All of the inter-VLAN and Internet bound traffic on my network runs through this and it’s been running pretty flawlessly for nearly two years.
On the other hand, given the length of time that has elapsed since I set this up and the writing of this post it means that this will be more like archeological exploration than documentation! I’m unlikely to remember every detail or the issues I encountered along the way. As such this post will pretty much document the state of the setup as I can extract it from the running system! Basically, you should only use this post as a rough guide and go away and do your own research. I’ll apologise for this incompleteness in advance. If you try this please let me know of anything I’ve missed and I’ll update the post with extra details.
How’s this going to work?
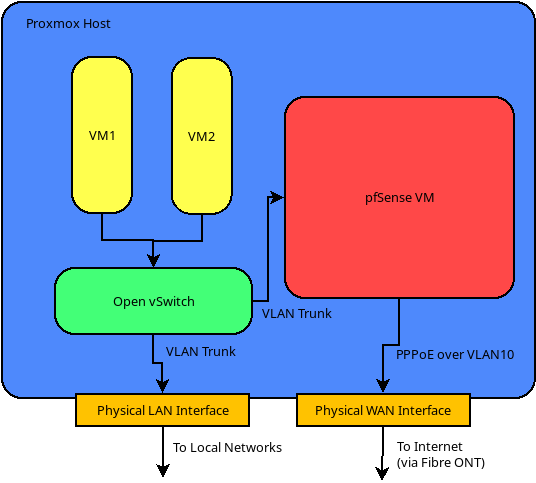
The basic premise of this whole thing is a Proxmox host with two physical NICs. One of these is the LAN port on which the host will have it’s internal IP. The second is the WAN port, which is assigned directly to the pfSense VM. In my case this is complicated by networking setup required by our Fibre connections here in NZ. These require a connection to the Fibre ONT on VLAN10 over which a PPPoE session to the ISP is established.
Since the WAN interface is directly assigned to the VM, this is all handled internally to pfSense. This means that that the host machine is not exposed to the external network. [OK, for the purists among you, this isn’t strictly true. The host will be exposed at lower levels of the network stack to allow it to forward packets through to the VM. However, since it doesn’t have an IP address on that interface it won’t be accessible from the Internet. I’m sure someone out there will tell me why this is all kinds of horrible.]
On the LAN side we create an Open vSwitch switch and add the LAN interface as a VLAN trunk on it. Another (virtual) trunk interface goes into the pfSense VM and becomes it’s LAN interface. This is analogous to just having another physical switch between the host and the VM. The purpose of this extra complexity is that it allows us to connect other VMs on the host into the vSwitch. These can be in on multiple different VLANs if required.
Hopefully the diagram below makes this somewhat clearer:
The Proxmox Host
The Proxmox host itself is a Dual Ethernet Haswell based mini-computer from AliExpress. I’ve been really happy with this as a platfrom aside from the fact that I would have spec’d it with more than 4GB of RAM if I’d been intending to run Proxmox initially. I also added an extra 120GB SSD drive on the internal SATA port for VM storage.
I started out with this host running pfSense natively, which also worked fine. One thing I did find is that when I switched over to Proxmox (Linux based) from pfSense (FreeBSD based) it ran much cooler. I guess that’s just down the the Linux kernel’s better hardware support.
This host is still running Proxmox 5.4 since I haven’t had time to upgrade it to 6.0 yet. This system is pretty much as close to “production” as it gets for me, since the Internet is used all the time!
Proxmox Network Setup
Proxmox enumerates the two NICs as ens1 (LAN) and enp1s0 (WAN). With the WAN port, I created a simple Linux Bridge vmbr1 to allow it to be added to the pfSense VM.
On the LAN side, I created an “OVS Bridge” port and added an “OVS IntPort” named admin which will be the primary interface to the host machine. As such, this interface is assigned a static IP and is assigned to the VLAN that we want the host to be on.

I have to give kudos here to the Proxmox developers. They’ve made the Open vSwitch setup here pretty much trivial! For what I would consider advanced functionality it’s just as easy as configuring any other network.
A note should also be given here as to what’s going to happen when you configure this. By design Proxmox doesn’t apply any networking changes until you reboot. This is pretty useful to prevent yourself getting locked out. If you are connected directly on the LAN interface (with a static IP) you should make sure that everything is correct before rebooting. After the reboot, reconfigure your local interface to the VLAN you chose in the setup and a static IP. You should then be able to access the Proxmox web interface again.
Setting Up pfSense
The pfSense installation was fairly standard. The only change I ended up making was to change the default CPU type to enable AES-NI instructions. This took a little bit of experimentation and looking up the capabilities of various processors, but I finally settled on the “Westmere” processor.

After setting this architecture in the VM settings, rebooting pfSense shows both the correct CPU architecture and that AES-NI is available. It seems that this is probably less important than it was when I set up the system, since Netgate have now decided that AES-NI will not be required for pfSense 2.5.0.

One other thing is that you should disable hardware checksum offloading to work with the virtio drivers, as per the official documentation. Before you do this the network will be very sluggish.
Once the pfSense installation was complete I restored from a backup of my previous setup. This made the task of setting up my interfaces significantly easier. However, I’ll go through the networking aspects anyway for those who may be setting up a new system.
pfSense Networking
Luckily for us the pfSense tool to assign interfaces allows us to also set up the VLANs. This is useful to set up a minimal configuration to get you access to the web interface. Basically you want to set up the VLAN for your main LAN segment. Then you can set up the pfSense LAN interface on this VLAN with a static IP. If you’re using a fibre connection similar to mine you can skip the WAN setup for now. Once the “Assign Interfaces” wizard is complete you should have access to the Web Configurator.
The next step was to setup my WAN connection. I first added a VLAN with tag 10 on the vtnet0 device which is the device that corresponds to the physical WAN bridge as enumerated by pfSense. I added a corresponding interface for this and then added a PPPoE interface using the details provided by my ISP. This is then assigned to the WAN interface via the “Interface Assignments” page.
In terms of setting up the local networks, you can pretty much set up whatever VLANs you would like at this point. Take a look at my previous post for inspiration.
Conclusion
As stated earlier, I’ve found this setup to be very stable in production and it’s even made my hardware run cooler. Having my firewall virtualised has also had several other benefits for me. Firstly, I can backup and snapshot the firewall VM at will. I no longer need to worry about an update or bad configuration hosing my firewall. I just snapshot before doing anything major and roll back if anything goes wrong.
The second major benefit is that I can run extra VMs and containers on the host machine, which I couldn’t when it was a dedicated firewall. I’ve used this to implement my small DMZ for Internet facing services. This has the added benefit that DMZ traffic only transits the vSwitch internal to the host and doesn’t have to be shuttled back and forth over the physical network infrastructure. This is much faster, since the virtualised interfaces should (in theory) be 10GBps. However, this is somewhat irrelevant when the upstream Fibre connection is only 100Mbps.
As always, I’m keen to receive feedback and constructive criticism of this setup. Please feel free to get in contact via the feedback channels.
Leave a Reply