This post is part of a series on this project. Here is the series so far:
Having recently moved into a new house, I find myself with a profusion of Smart Lights. These are by no means everywhere yet, but in more locations than I have previously had. The main problem is that I currently lack a way to drive these intelligently. Right now I have a few automations that drive them based on sunset/sunrise times and media state through Home Assistant. This is mainly due to having almost no sensors deployed in the new house currently – something I’m aiming to address in this project with my Micropython Room Sensor.
I’m planning to build and deploy a set of ESP8266 based sensors across the house, with at least one in each room. The base hardware for this is the ESP8266 connected to a PIR motion sensors and DHT22 temperature and humidity sensor (so nothing ground breaking). This should give me temperature/humidity data for the whole house as well as motion events that can be used as a starting point to drive the light automation.
Why ESP8266?
I’ve gone through several options for the sensor platform on the way to settling on the ESP8266. I’ve tried out MySensors and even gone as far as building a battery powered prototype complete with PCB. Unfortunately I stuffed up the PCB design so that the radio didn’t work and never got around to working out the problem. Thinking further on this I find the software platform limiting. For example, any kind of OTA firmware update is difficult.
The main disadvantage of the ESP8266 is the power usage. However, given that I now own this house and that these are permanent sensors this becomes less of a problem. I’m planning on powering them via a 12v supply run from the main server cabinet through the roof space to each sensor. There is more than enough power from a 12v 2A supply to provide power to all the sensors.
Also, it’s cheap and easy to work with!
Why Micropython?
I had originally looked at either writing some custom firmware using the Arduino ESP8266 core or using ESPEasy. I’ve tried out ESPEasy on my first prototype and it does what I need, but as an Embedded Software Engineer by day I felt I needed to be more adventurous.
I love Python as my go to language whenever the platforms don’t dictate something else (in the case of embedded this almost always ends up being C or C++). Recently I’ve been getting more engaged with the Python ecosystem via a couple of excellent podcasts (Talk Python and Python Bytes), so this was a good time to get back into writing some Python at home. I had played around with earlier versions of Micropython on both the ESP8266 and the ESP32 so I had a good idea of its capabilities and knew it could do what I needed.
Current Status
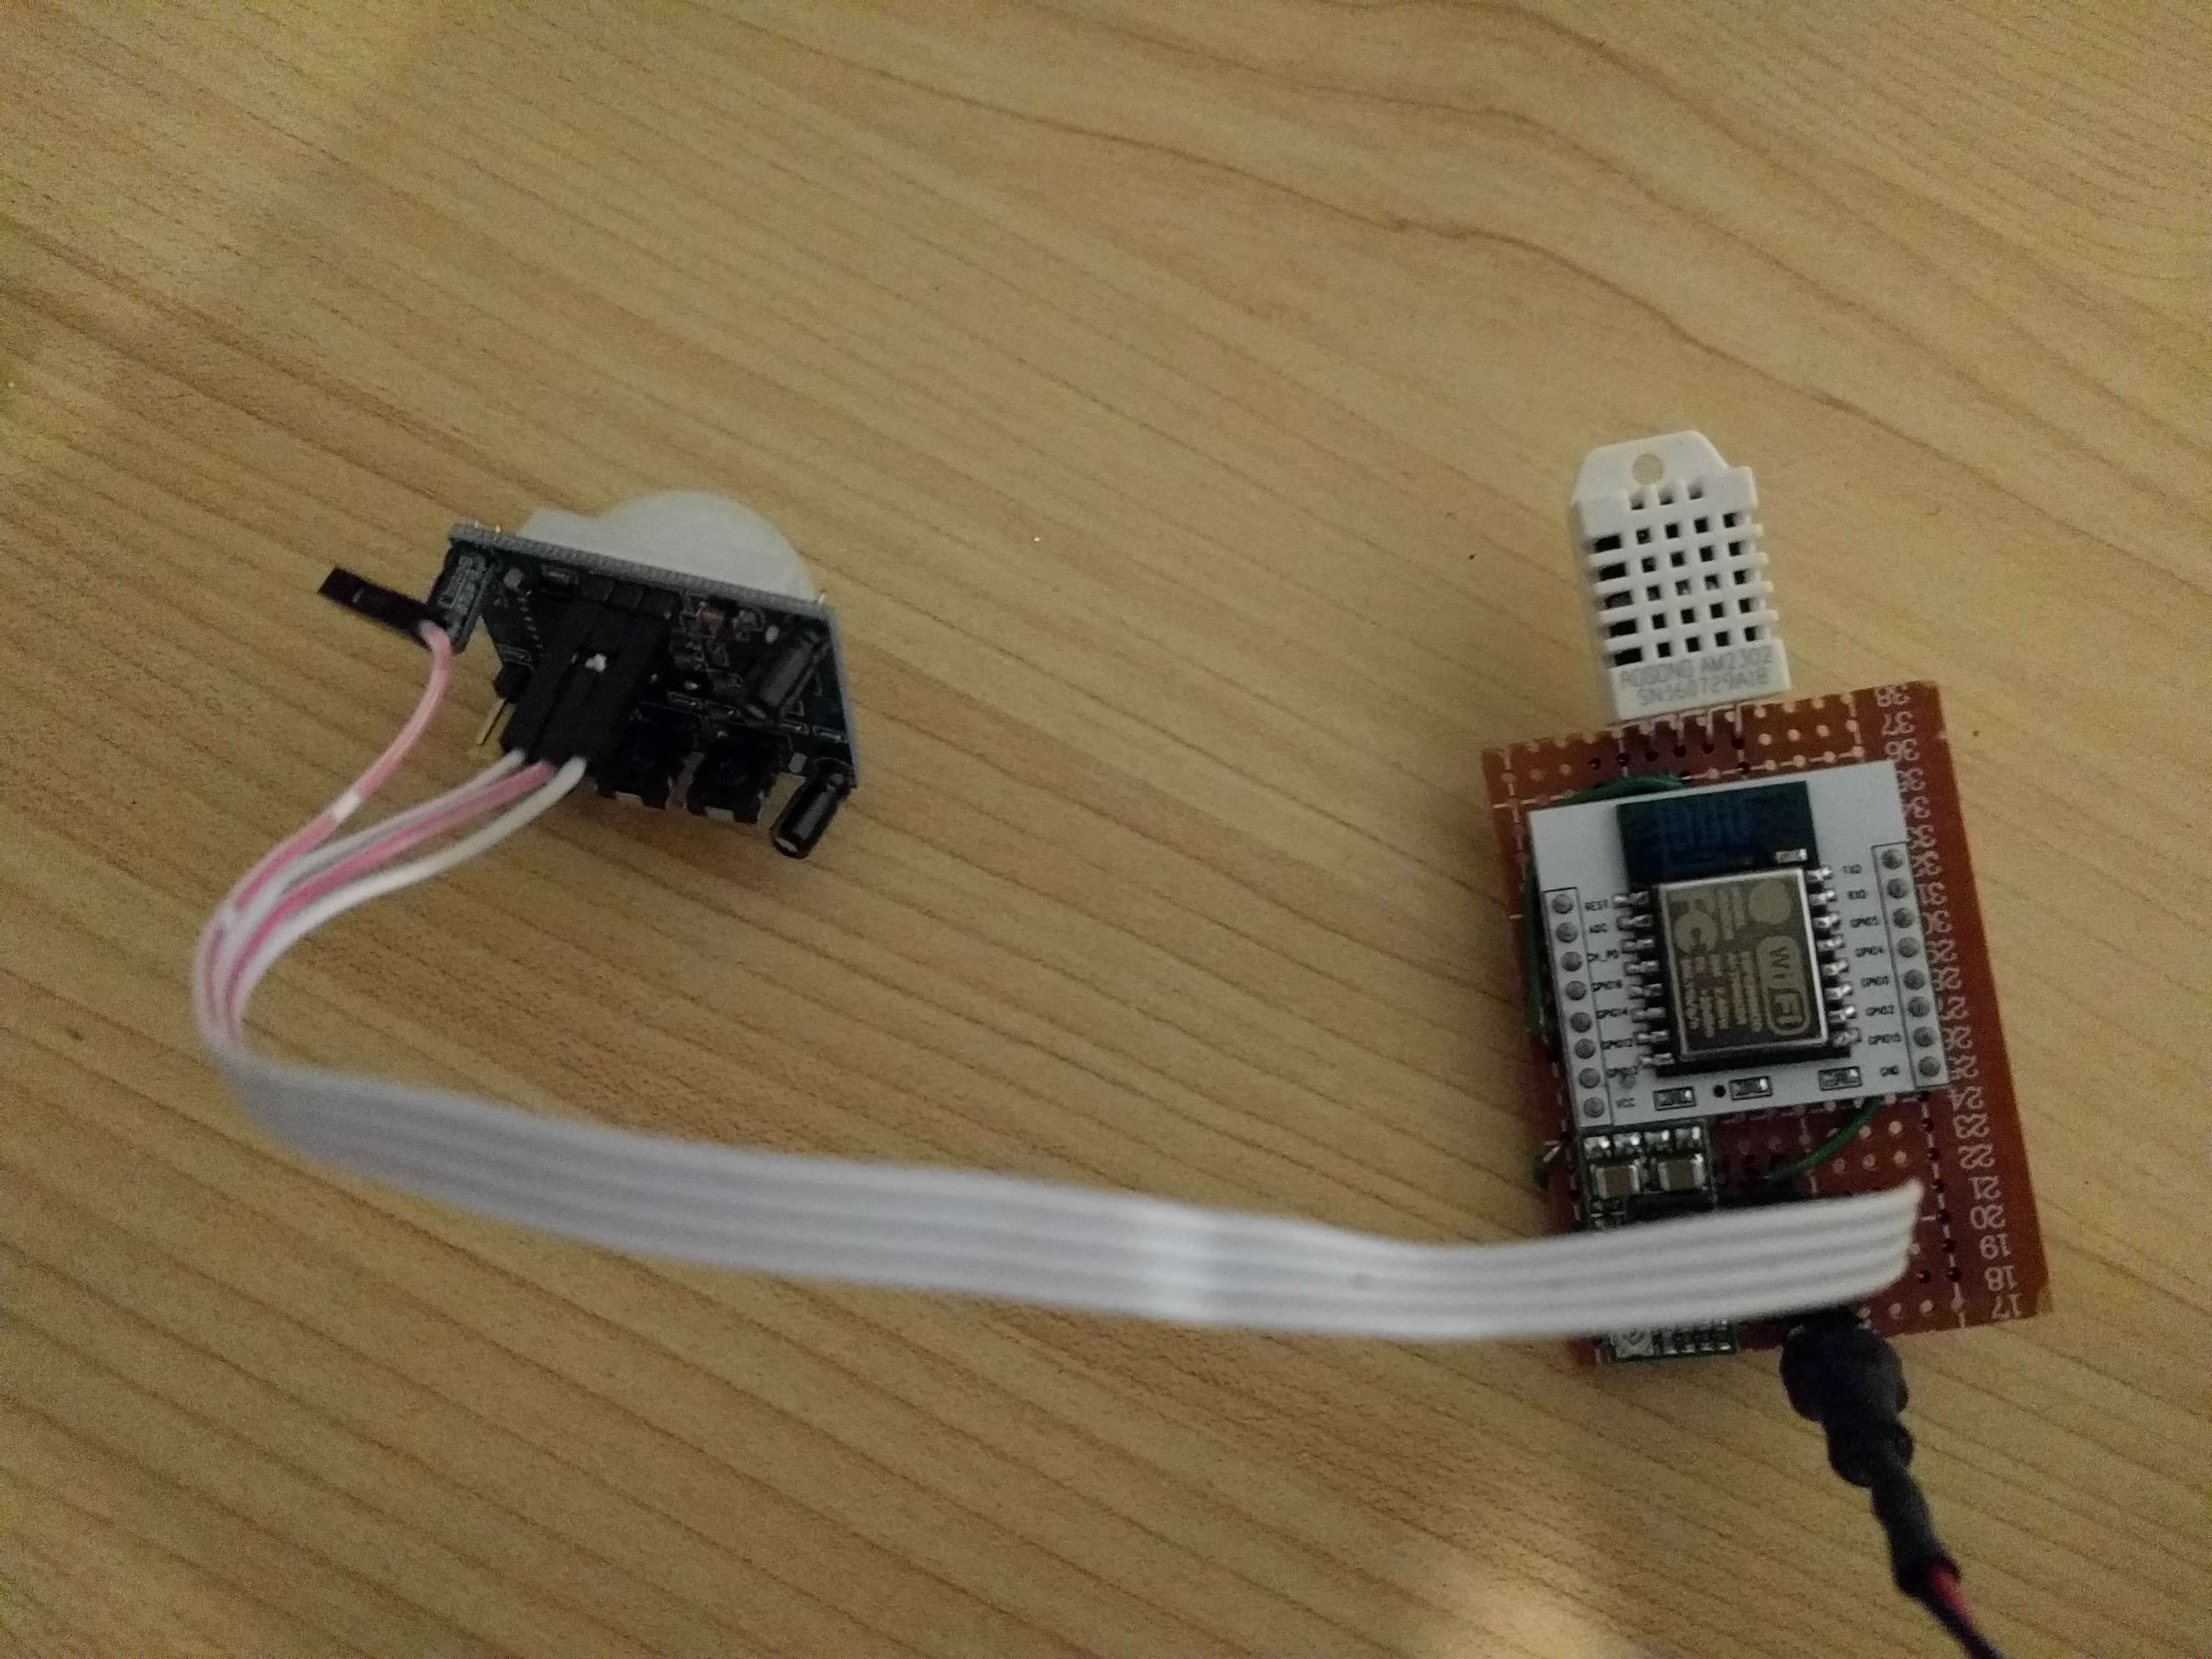
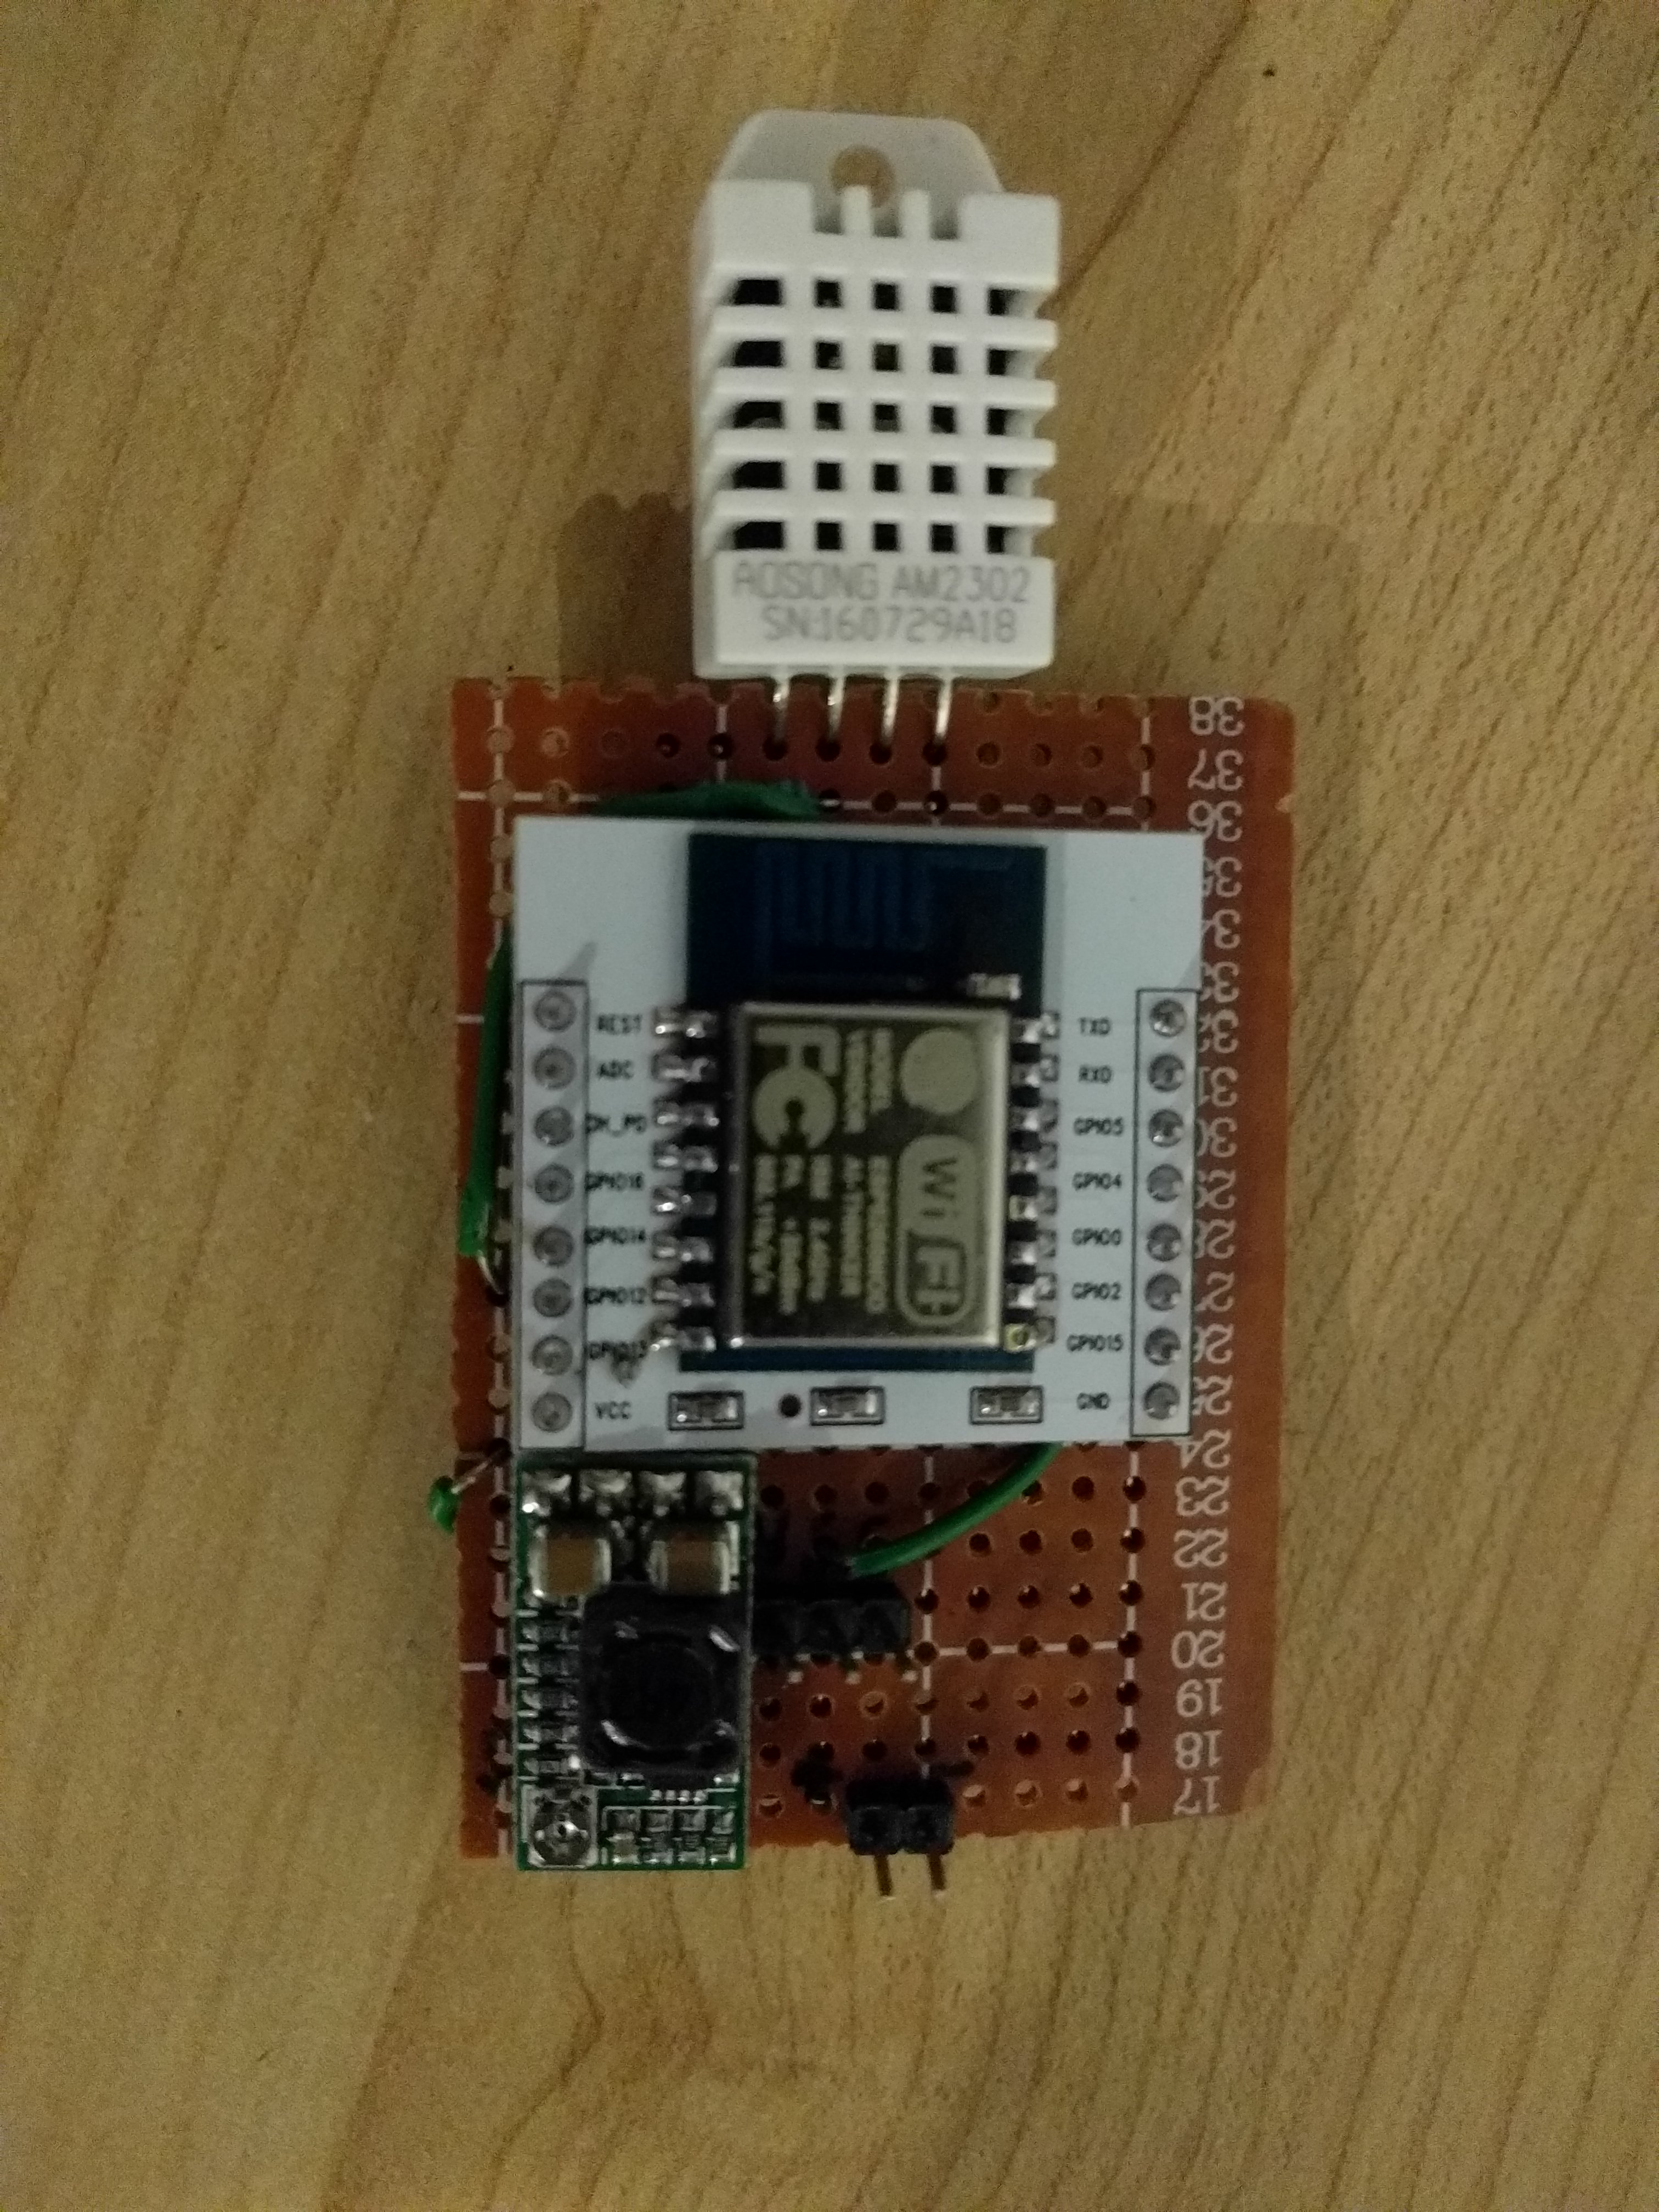
As of right now, I have one prototype sensor running using a ‘bare’ ESP-12 module with adapter board, plus the sensors soldered on to some vero-board (photos below). Using the ‘bare’ ESP module added quite a bit of complexity since you are responsible for pulling the various lines required to program/run the chip up or down. It’s not difficult, but it’s more difficult than it should be. For that reason, after I’ve exhausted my one remaining ‘bare’ module/adapter I will be switching to Wemos D1 Mini modules.
In terms of the hardware, I encountered a couple of issues building the first prototype. The ESP8266 adapter board I used has a regulator to take 5V down to the 3V3 required for the ESP. However, I wanted to use 12V to reduce the voltage drop through the wires in the ceiling space. This meant I needed another regulator to go from 12V down to 5V.
A Mistake in Regulation
At first I used a spare linear regulator I had in my parts box for this. As it turns out this was a mistake. Whilst it powered the ESP and sensors just fine, the whole thing got very hot (even with an extra heat sink). This also affected the reading from the temperature sensor. The solution was to order some cheap buck converter modules online. These did the trick without getting the slightest bit warm and are much more efficient.
Flash Issues
The second issue is a weird one. Whilst re-programming the ESP from ESPEasy to Micropython, I noticed that after running the erase flash command the current going to the board would get very high (~400mA at 12V!). This would result in the ESP getting very hot. Seemingly this didn’t damage it because I did it several times and it always continued to work. In addition to this the Micropython firmware wouldn’t boot, instead just spewing incomprehensible (at any of the common baud rates) garbage to the UART. As it turns out, the chip was not being erased correctly, running an erase regions across the full extent of flash did the trick:
esptool.py --port /dev/ttyUSB0 erase_region 0 4194304
If anyone knows what the problem with these modules is, please get in touch in the comments. I couldn’t find any reference to this problem online and the (probably cloned) Wemos modules I have don’t have the same problem.
Anyway, here are some photos of the finished prototype:

The Micropython Room Sensor Software
The software is fairly basic, but has a few nice features. I use the boot.py script to load the configuration from the config.json file on the internal filesystem. I then connect to the wifi following the example given in the Micropython documentation.
After this main.py is executed which connects to the broker and initialises the sensors. This is where things get a bit more interesting. I’ve written a minimal implementation of the Home Assistant MQTT Discovery spec, which so far supports binary sensors and standard sensors. This allows the sensors to come up in HASS without any configuration on the HASS server (except enabling MQTT discovery, which is a one time operation).
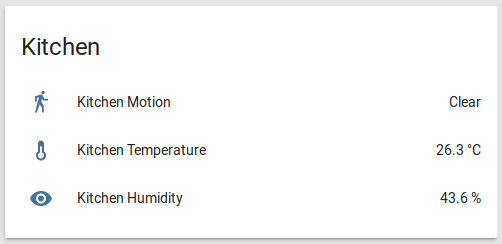
Reading from the sensors themselves is fairly standard. I use a pin change interrupt for the motion sensor and the standard dht module for the temperature/humidity. The use of uasyncio allows the DHT sensor to be polled at regular intervals. The code for the whole program is available via GitLab (also mirrored on GitHub). You can see a screenshot of the sensors in HASS below:
How Did Micropython Perform?
In comparison to other embedded platforms/languages, writing a Micropython application is awesome. The power of Python makes you extremely productive. I wrote the whole software in a couple of hours, including the MQTT discovery implementation, using a Wemos board with no sensors connected as my development platform.
When I uploaded this to the prototype board it hit a couple of exceptions in the sensor code, which previously hadn’t been exercised. The key thing here is that it hit exceptions! The resulting stack traces of course tell you where and why the exception occurred. What could have been a long and arduous debugging session turned into a few minutes of tweaking. The availability of uasyncio is also a really nice feature and allows direct knowledge transfer from CPython.
Future Work
There is still some work to do in order to finish the project, mostly on the hardware side. Obviously I need to make enough sensors to cover the house, which is just an ongoing assembly task. There is also the in ceiling wiring, assembly into cases and mounting. I’ll be sure to post an update on this as I make progress. There are also a couple of software improvements I would like to make.
Firstly, I would like to add a meta sensor which makes use of the LWT feature of MQTT to report the status of the unit, but also still utilises HASS MQTT discovery. I’m also planning to spin out the current MQTT discovery implementation into it’s own Python module. Ideally this will be published to PyPI. The only other software task is to write a script to automate the deployment of the Micropython firmware, application and device specific configuration. This should be extremely useful when programming multiple units.
Thats all for now. I’ll be posting further parts in this series as the project progresses.
Leave a Reply