One of the best things about writing this blog is the interactions I have with other people. Of course it’s always nice to get feedback, whether it’s positive or (constructively) negative. It’s even better to see what similar projects other people are undertaking. Sometimes comments even start me off in a different direction than I had been taking.
This project was inspired by one such conversation. This started out rather gruff but actually ended up being really positive and motivated me to go further with an approach that I’d mostly dropped. The conversation in question was in relation to my recent “Seven Home Assistant Tips and Best Practices” post. Specifically it was around testing and deploying your Home Assistant config with Continuous Integration (via Gitlab CI).
I’m already familiar with Continuous Integration and Continuous Deployment through work. I had developed a minimal setup for validating my HASS config. However, I’d previously given up on it due to the slowness of Gitlab’s shared CI runners. What follows is my new attempt. Thanks to /u/automate_the_things and all the other commenters on that thread for the inspiration/persuasion to do this!
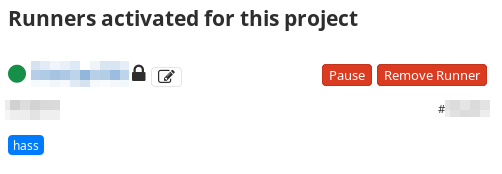
Setting Up a Local Runner
Ideally, I’d like to fully self host my own Gitlab instance. However, the recommended RAM requirements are between 4 and 8GB, which is a little ridiculous. Perhaps when I upgrade my server I’ll be able to spare enough RAM for this. For now I’m just running a local runner and connecting it to the cloud version of Gitlab.
I decided to go with deploying the runner as a Docker container and also executing my jobs also within their own containers. This fits with my recent Docker shenanigans and I’m familiar with this setup having deployed it for work. CI systems are one area where I’ve always felt that using containers makes sense, even before my recent Docker adventures. Each build running in it’s own container removes a lot of the complexity in managing build environments for different projects. It also means that your build machines only require Docker.
I set up my runner in a new VM on my main server. Then I pretty much just followed the official instructions to install the runner. I did convert the docker run command to a minimal docker-compose.yml file for ease of reproduction however:
version: '3'

services:
  gitlab-runner:
    image: gitlab/gitlab-runner
    volumes:
      - /home/rob/docker-data/gitlab-runner:/etc/gitlab-runner
      - /var/run/docker.sock:/var/run/docker.sock
Once that was done, I finished by getting the runner registered and connected to my project.

Build Pipeline Configuration
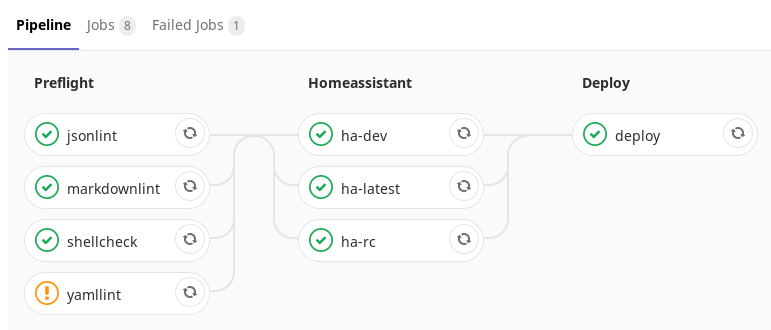
In my research for this project, I came across Frenck’s Gitlab CI configuration, which is really awesome (thanks @Frenck). I’ve based mine heavily on his with some tweaks for my configuration and environment. The finished pipeline runs the following jobs:
shellcheck– this job performs various checks on any shell scripts in the repositoryyamllint– this job performs a full lint check of all my YAML files. Since I’ve never run this before it threw up loads of errors. I started fixing a few of these, but eventually marked the job withallow_failure: trueto allow the pipeline to continue even with these errors. I’ll work on fixing these issues bit by bit over the next few weeks. I also remove some files which are encrypted withgit-cryptjsonlint– pretty much the same asyamllint, but for JSON files. Any files that are encrypted are excluded from this check.markdownlint– similar as the previous jobs, but for checking of markdown files (such as the README.md file)ha-latest– checks the HASS configuration against the current release of Home Assistantha-rc– runs a HASS configuration check against the next release candidate for Home Assistantha-dev– checks the HASS configuration against the development version of Home Assistant. Both of these jobs are configured to allow failure. This is just intended to give me advanced warning of and breaking configuration that may prevent HASS from starting up in a future release.deploy– deploys the configuration to my HASS server. I’ll discuss this in more detail below.

You can find the finished configuration in my hass-config repository.
Deployment Approaches
There are several ways I could have done the deployment, which may suit different scenarios:
- We could use the Home Assistant Gitlab CI sensor to poll the pipeline status. We would then trigger an automation to pull down the configuration when the pipeline passes. I haven’t tried this approach. However, it is potentially useful if your HASS server and Gitlab runner are on different networks and your HASS server is not publicly available.
- We could use a pipeline webhook from Gitlab to a webhook handler in HASS. This would trigger an automation similar to that above. Again, I haven’t tried this. It would be useful if your Home Assistant instance and Gitlab CI runner are on different networks. However, it would require your HASS instance to be publicly available.
- Similar to the approach above you could trigger the HASS webhook handler from a job in your Gitlab runner directly with CURL (rather than using the built in webhooks). This has the advantage over the previous two approaches that it gives you an explicit deploy stage in your pipeline. This is turn gives you the ability to track deployments via environments. It’s also potentially a lot simpler, since it would only be triggered if the previous stages in the pipeline passed. You also wouldn’t have to parse the JSON payload.
- The approach I have taken is to deploy directly from the runner container via SSH. This is because my runner and HASS machines are running in the same network and so I can easily SSH between them without having to open any ports through my firewall. It also centralises all the deployment logic in the CI configuration, without any HASS automations needed.
My Deployment Job
As per my CI configuration, the deployment job is as follows:
deploy:
  stage: deploy
  image:
    name: alpine:latest
    entrypoint: [""]
  environment:
    name: home-assistant
  before_script:
    - apk --no-cache add curl openssh-client
    - echo "$DEPLOYMENT_SSH_KEY" > id_rsa
    - chmod 600 id_rsa
  script:
    - ssh -i id_rsa -o "StrictHostKeyChecking=no" $DEPLOYMENT_SSH_LOGIN "cd /mnt/docker-data/home-assistant && git fetch && git checkout $CI_COMMIT_SHA"
    - "curl -X POST -H \"Authorization: Bearer $DEPLOYMENT_HASS_TOKEN\" -H \"Content-Type: application/json\" $DEPLOYMENT_HASS_URL/api/services/homeassistant/restart"
  after_script:
    - rm id_rsa
  only:
    refs:
      - master
  tags:
    - hass
As you can see, this job runs in a plain Alpine Linux container and is deploying the the home-assistant environment. This allows me to track what versions were deployed and when from the Gitlab UI.
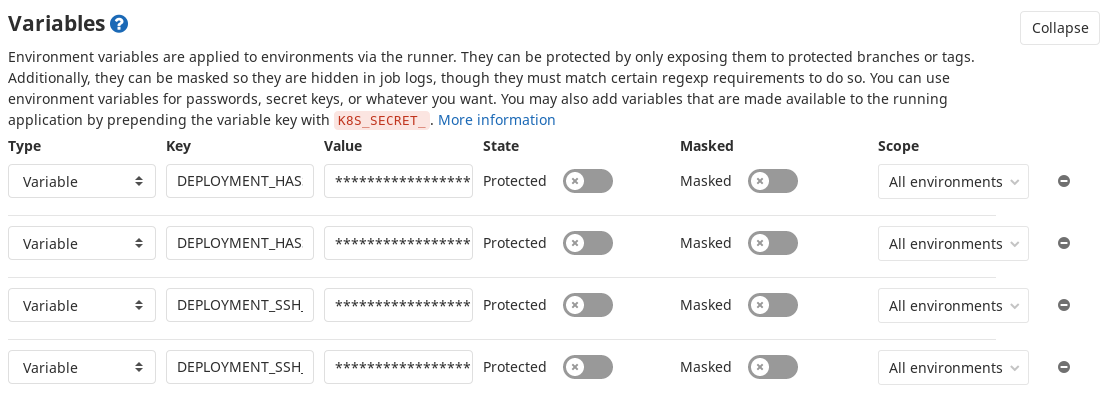
The before_script portion installs a couple of dependencies which we need for later and pulls the (password-less) SSH key we need for logging into the HASS server from the project variables. This is stored in the $DEPLOYMENT_SSH_KEY variable in the Gitlab configuration. The resulting file must have it’s permissions set to 600 to allow the SSH client to use it.
Moving on to the script portion. The first step performs the actual deployment of the repository to the server via SSH. Here we use our SSH key that we wrote out above. The public portion of this is installed on the HASS server as for the ci user. We also disable strict host key checking to prevent the SSH client prompting us to accept the fingerprint.

The SSH command connects to the server specified in $DEPLOYMENT_SSH_LOGIN, which is again set in the Gitlab variables configuration. This has the form ci@<hass host IP>. It should be noted here that the Alpine container defaults to using Google’s DNS. This means that resolving internal hostnames for your network will fail. I’m using the IP addresses for now to get around this.
Remote Control Commands
The SSH command sends a sequence of commands to be run on the HASS server. These commands are as follows:
cd /mnt/docker-data/home-assistant– change directory to the configuration directory on the servergit fetch– fetch all the new stuff via gitgit checkout $CI_COMMIT_SHA– checkout the exact commit that we are running a pipeline for via one of Gitlab’s built in variables
This arrangement of commands allows me to control exactly what gets deployed to the server for each pipeline run. In this way we won’t accidentally deploy the wrong version if new code is checked into the server whilst our pipeline is running.
In order for the git fetch command to work another password-less SSH key is required. This time this is for the ci user on the HASS system. The public portion of this is installed as a deploy key for the project in Gitlab. I suppose it’s equally valid to pull changes via HTTPS (for public repos), but since the remote on my repository was already set up to use SSH I decided to continue using it.
Restarting Home Assistant from Gitlab CI
The second command in our script section is to restart Home Assistant after the configuration has been updated. Here we use CURL to call the homeassistant.restart service as per the API docs. The Home Assistant authentication token and URL are stored in Gitlab CI variables again.
Finally, we enter the after_script section, which will be executed even in the case that one of the above commands fails. Here we simply delete the id_rsa SSH key file.
I’ve restricted my deploy job to run only on pushes to the master branch. This allows me to use other branches in the repo as I please without having them deployed to the server accidentally. I’ve also used a tag of hass to prevent running on runners not intended for this job. Since I only have one runner right now this isn’t a concern, but having it in place makes things easier if/when I add more runners.
Conclusion
I’m really pleased with how this CI pipeline has turned out. However, I’m still a little concerned at how long all these steps take. The latest pipeline took 6 minutes and 42 seconds to run (plus the time it takes HASS to restart). This isn’t very much if it’s just a fire and forget operation. It is however, a long time if I am trying to iterate on my configuration. I’m going to play around with the runner configuration to see if I can get this down further. I also want to investigate options for testing on my local machine. In my previous attempt at this my builds could sit for longer than this waiting for one of Gitlab’s shared runners. So I’ve at least made progress in the speed department.
Next Steps
In terms of further improvements, I’d like better notifications of the pipeline progress and notifications when HASS competes it’s restart. I will implement these with Gotify. Right now I only get an email if the build fails from Gitlab. I’m also going to integrate the pipeline status into Home Assistant with the previously mentioned Gitlab CI sensor. I’m even tempted to turn one of my smart lights into a build light to alert me to problems!
I also want to take my use of CI in my infrastructure further. My next target will be building some modified Docker images for a couple of my services in CI. Deployment of the relevant Docker stacks is another thing I’d like to try out. I’ve not had chance to play with building containers via Gitlab CI before so that will be interesting.
I hope that you’ve enjoyed this post and that it’s inspired you to give something similar a go. Thanks to this pipeline I’ll never have to worry about HASS being unable to start due to a broken configuration again. I’m open to further improvements to this process. Please feel free to share any you may have via the feedback channels. Thanks for reading!
Leave a Reply