This post is part of a series on this project. Here is the series so far:
In my first post of this series, I outlined my plan to convert my infrastructure over to a layered setup. This would consist of virtual machines (in various VLANs), with most of the services running in Docker. This post details the second stage of my road to Docker, although really was is the first stage since I’m writing these out of order! I actually converted my home automation systems over to Docker before tackling the web stack.
The motivation behind upgrading the home automation system first was to do it at the same time as I did a large update to Home Assistant, since I’d been holding back on updating. The main reason for this was the switch to Lovelace as the default UI, which I was dreading. As it turned out, I waited long enough for the awesome HASS developers to make all my problems go away (or at least the Lovelace related ones).
System Summary
I’ve written about my home automation setup before, but here is a brief recap of what I’m running (only the server side stuff):
- Home Assistant: provides the main brains of the system and integrates all my devices as well as driving most of the automation
- MQTT: via the Mosquitto broker, which is used to connect many of the devices in the house
- Node-RED: the home automation server also houses the main Node-Red instance (others are scattered around on various Raspberry Pis). Although I call this the main instance, it doesn’t do a whole lot and mostly gets used for testing right now.
- Zigbee2mqtt: this is a fairly recent addition and provides a bridge between my zigbee devices and MQTT/Home Assistant.
I had also been running InfluxDB and Grafana. However, something broke in my setup and I hadn’t got around to fixing it. I therefore decided to cut my losses with that and not reinstall it (for now).
Finding Docker Images
Luckily for me, the four main components of my system all have official/recommended Docker images available. This was useful as I’m always pretty reticent to use some questionably maintained image from the Docker Hub, mainly due to the lack of security updates. I also wanted to avoid building custom Docker images for now, until I work out a decent update strategy.
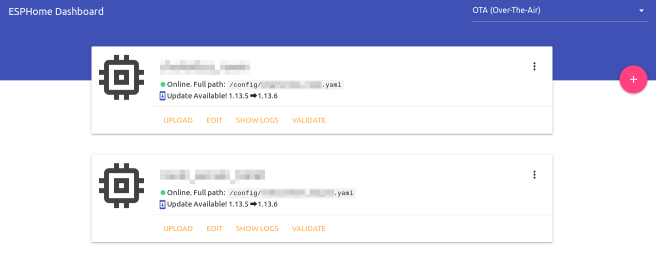
In addition to the four services above I wanted to run the ESPHome dashboard in order to manage my devices better. I had previously just been using the command line tool to build and upload to them. This also has an official Docker image.
I also ended up running a MaryTTS container to replace PicoTTS that I had been running for my voice announcements. This is due to the lack of PicoTTS inside the HASS Docker image. It was recommended that I use the silversniper/marytts image. Looking at this image, it hasn’t been updated in three years which. This reinforces my point about random images from Docker Hub. Luckily, this isn’t an externally facing application so it isn’t too critical from a security standpoint. However, I think I’ll look into updating that at some point.
Stacking Containers, again…
I set up a new clean VM inside my home automation VLAN. I was a little reserved about doing this, since it means everything in that VLAN (most of which is blocked from the internet) can see the full HA server. However, my main worry over not doing that was the mDNS used by ESPHome. If I can get Avahi/mDNS working across VLANs at some point I will move it. I still have a big network re-organisation to do, so hopefully it will get done then.
The full docker-compose.yml file for my new stack is given below:
version: '3'

services:
  mosquitto:
    image: eclipse-mosquitto
    restart: always
    ports:
      - 1883:1883
      - 8883:8883
      - 9001:9001
    volumes:
      - /mnt/docker-data/mosquitto/config:/mosquitto/config
      - /mnt/docker-data/mosquitto/data:/mosquitto/data
      - /mnt/docker-data/mosquitto/logs:/mosquitto/logs

  zigbee2mqtt:
    image: koenkk/zigbee2mqtt
    volumes:
      - /mnt/docker-data/zigbee2mqtt:/app/data
    devices:
      - /dev/ttyACM0:/dev/ttyACM0
    depends_on:
      - mosquitto
    restart: always
    network_mode: host

  homeassistant:
    image: homeassistant/home-assistant
    volumes:
      - /mnt/docker-data/home-assistant:/config
      - /etc/localtime:/etc/localtime:ro
    depends_on:
      - mosquitto
    restart: always
    network_mode: host

  nodered:
    image: nodered/node-red-docker:v8
    ports:
      - 1880:1880
    volumes:
      - /mnt/docker-data/node-red:/data
      - /etc/localtime:/etc/localtime:ro
    depends_on:
      - mosquitto
      - homeassistant
    restart: always

  esphome:
    image: esphome/esphome
    volumes:
      - /mnt/docker-data/esphome:/config
    restart: always
    network_mode: host

  marytts:
    image: sliversniper/marytts
    ports:
      - 59125:59125
    volumes:
      - /etc/localtime:/etc/localtime:ro
      - /mnt/docker-data/marytts/lib/voice-dfki-poppy-hsmm-5.2.jar:/marytts/marytts-5.1.2/lib/voice-dfki-poppy-hsmm-5.2.jar:ro
    restart: always
There’s nothing particularly earth shattering here. The main point of interest is that I mount the voice file for my preferred MaryTTS voice inside the container. Actually finding the voices is a little interesting. The official way to download them is a GUI tool that won’t run inside the container. I eventually found the XML file which lists all the available voices and extracted the URL of the one I wanted (the online demo helps to decide).
The only other parts worth noting are that I mount all my volumes under /mnt/docker-data, which is an NFS share onto the ZFS array of the virtual machine host. This then gets rolled into my normal backups. I also didn’t bother with a reverse proxy for any of this, since I already have one for HASS sitting in my DMZ (yet to be Dockerised). The other services just get accessed via the machine hostname and port since they are only used internally.
Sometimes Waiting Pays
I didn’t run into any issues particular to setting this up in Docker. At this point I think it’s a pretty well trodden path and this setup is pretty much standard. I did however run into several issues with upgrading to the latest Home Assistant.
First, lets tackle the elephant in the room – Lovelace. I was really worried going into this that it was going to be a huge amount of work. My mind was somewhat put at rest by seeing the UI editor in action via misperry’s video. When I actually came to it, the migration process automatically re-created my existing UI pretty much perfectly. Lesson learned: there is something to be said for waiting for mature software, rather than jumping on the new shiny thing immediately!
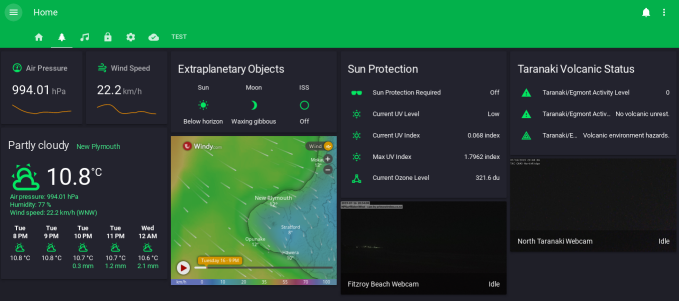
Lovelace itself is awesome! The ease of configuration has made me actually focus on making my HASS UI nicer rather than just the bare minimum I could get away with that I had previously. In the screenshot below, you can see my new “Outdoors” panel. This contains weather information, outdoor related sensor readings and a couple of local webcam views.
Remaining Issues
Most of my remaining issues were due to the Home Assistant “Great Migration”. This resulted in a load of entity IDs changing in various components. Obviously, this resulted in my having to update my configuration to change all the names. It took a little while to troubleshoot. This was because if the changed name is used in an automation, the automation has to actually fire to cause an error. In many cases it also just won’t fire, if the name is used in the triggers for the automation.
The final major issue I encountered, was with my frankly awesome vacuuming robot, which appeared to stop reacting to service calls in HASS. The underlying issue appears to be the Botvac D3 returning a different error message than the D7 that the library was tested with. So far this hasn’t been fixed, but I’m currently using the category: 2 workaround suggested and that’s working fine. I think I’ll have a look into fixing that issue and submit a PR when I get time.
Managing Updates
Managing updates to Docker images has always been an bit of an issue for me. In the past I’ve used Watchtower with some success. However, due to the capacity for breaking changes I want to manage HASS updates more carefully. It was suggested to me to just use a bash script which I can run periodically to do this. This isn’t something that had occurred to me before, probably because it’s so simple! Here’s the script I’m using:
#!/bin/bash
set -e

cd /mnt/docker-data/stacks/ha
sudo apt update
sudo apt upgrade -y
sudo apt autoremove -y
sudo apt clean
docker-compose pull
docker-compose down
docker-compose up -d
docker system prune -fa
docker volume prune -f
exit
This works beautifully and allows me to easily keep up with release to HASS and the other components, once I’ve verified that it’s reasonably safe to update.
Conclusion and Next Steps
Overall I’m pretty happy with how this move has turned out. Once the initial teething issues were all worked out the system has been very stable. I’m appreciating the extra utility of the ESPHome dashboard, which makes it very convenient to update my devices. It’s also great to be back on the latest version of Home Assistant.
In terms of next steps, I would like to give InfluxDB and Grafana another try. My main issue here has always been building the dashboards. It seems to be pretty tricky to get something both good looking and useful in Grafana. I also haven’t seen any pre-built dashboards for use with data from Home Assistant. Perhaps this is because they are so peculiar to individual setups.
I also have an LXD container running ZoneMinder. I’d like to re-deploy this as a Docker container on the same VM. Previously, I’ve not had too much luck running ZoneMinder in Docker. I’ll to see if the situation has improved when I tackle this migration.
I’m not actively working on any further migrations of other services to Docker at the moment, so there will probably be a break in this series for now. However, given my current success I’ll definitely be continuing on with this migration. I just want to work on some other projects for a while!
Leave a Reply